- Home
- Features
- Product Specifications
- FAQ
- Manual
- App
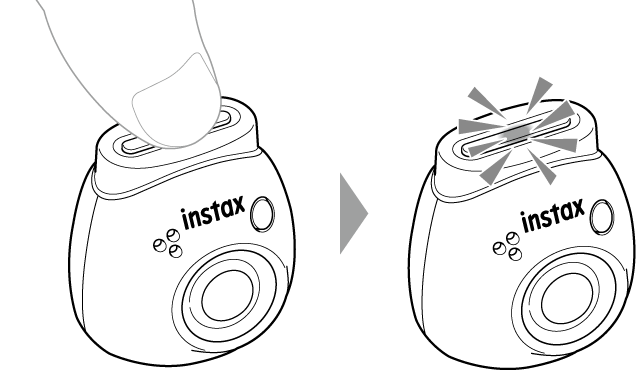
The power button is located on the top of the camera.
Press and hold the power button for 2 seconds. The LED lights up to indicate
that the power is on.
Follow the steps below to enter your serial number*.
*The serial number is located on the bottom of the camera or on the back of the packaging.
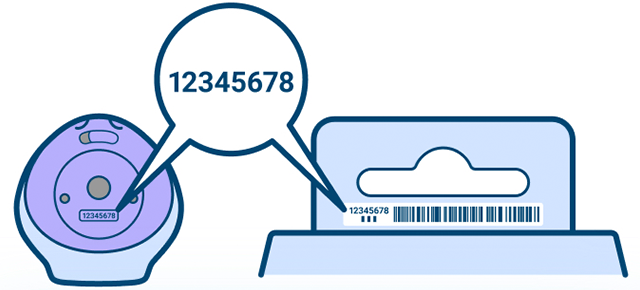
1. To use your smartphone camera to scan the serial number on the bottom of the camera
1) Tap "Scan with your camera"
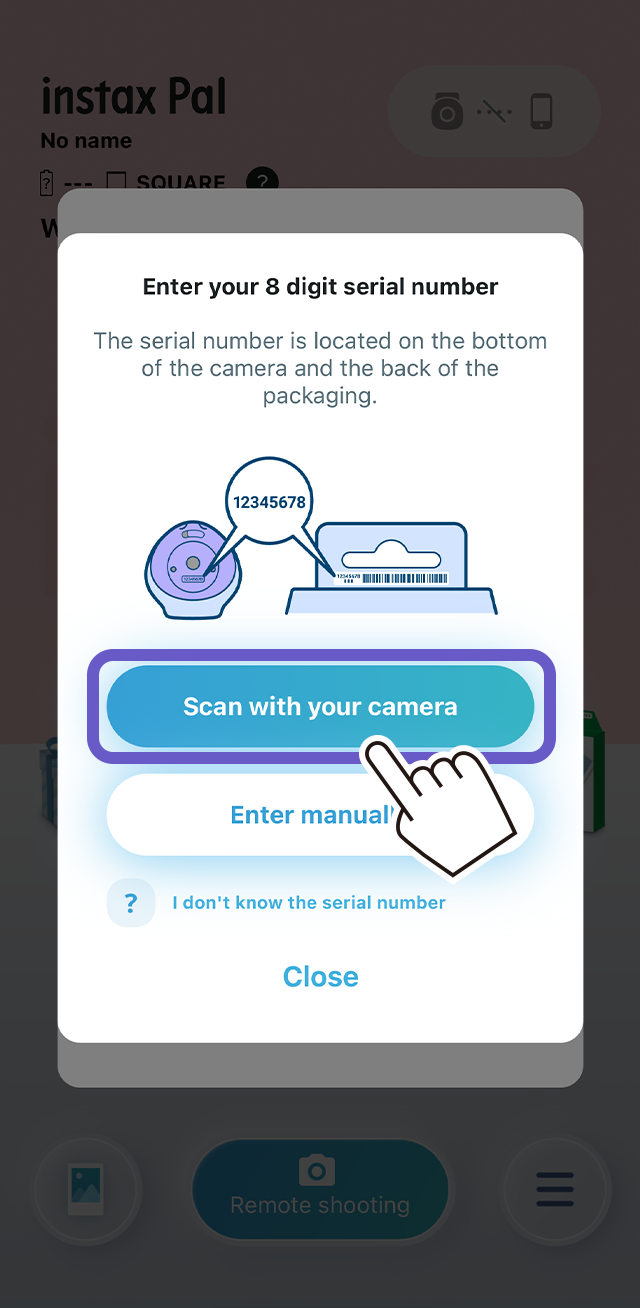
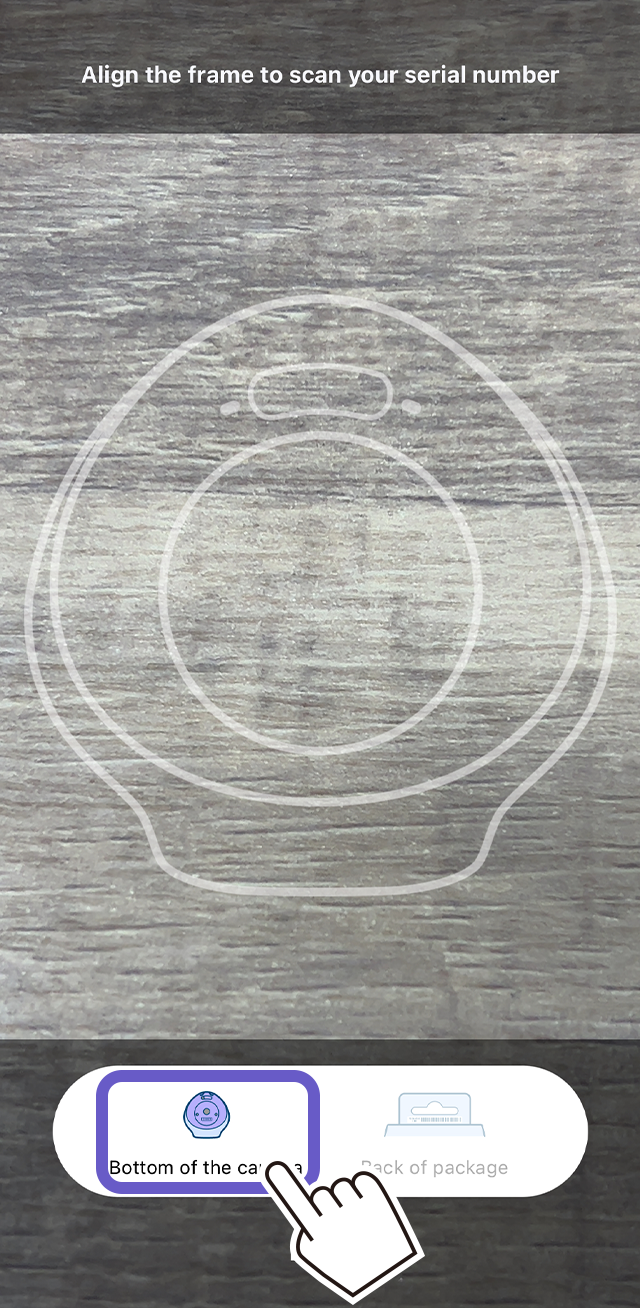
2) Select "Bottom of the camera", then align to the frame to scan
3) Make sure the number is correct, then tap "OK"
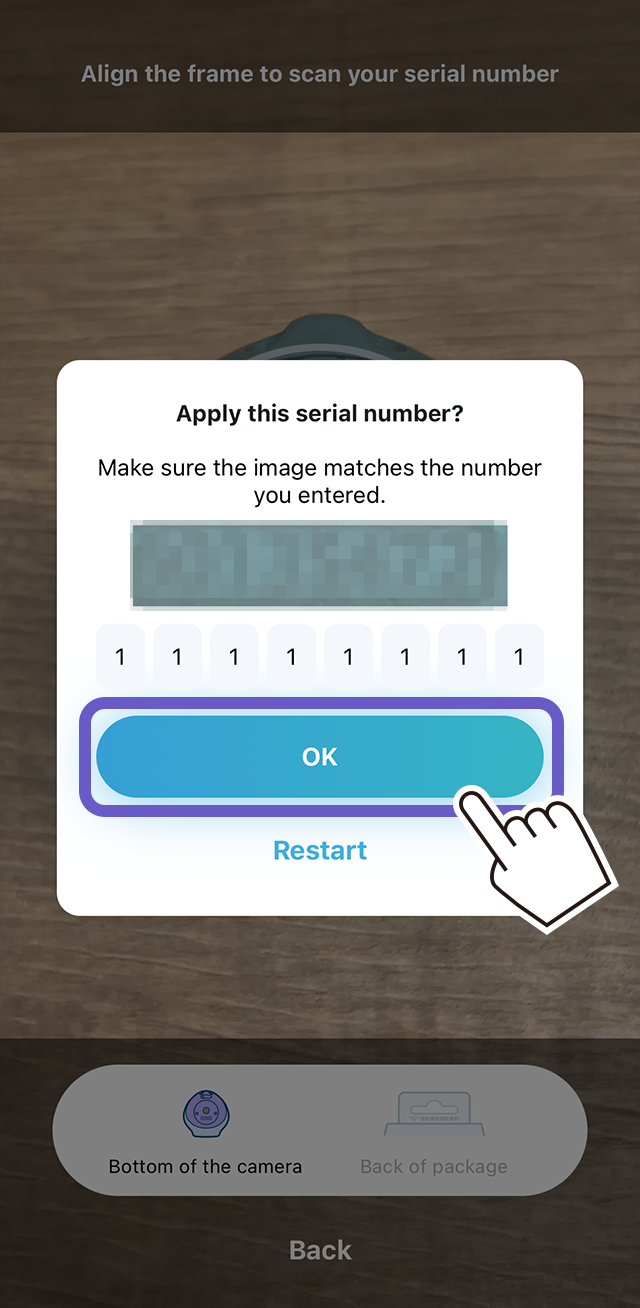
*The scanned number can be adjusted manually.
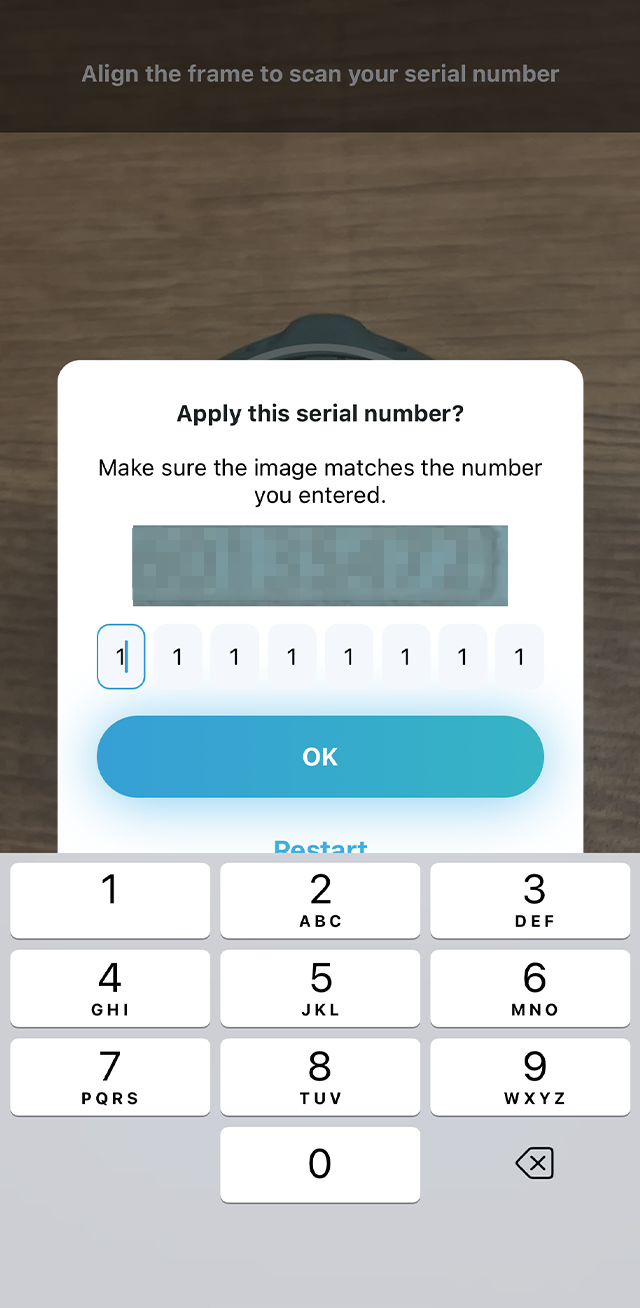
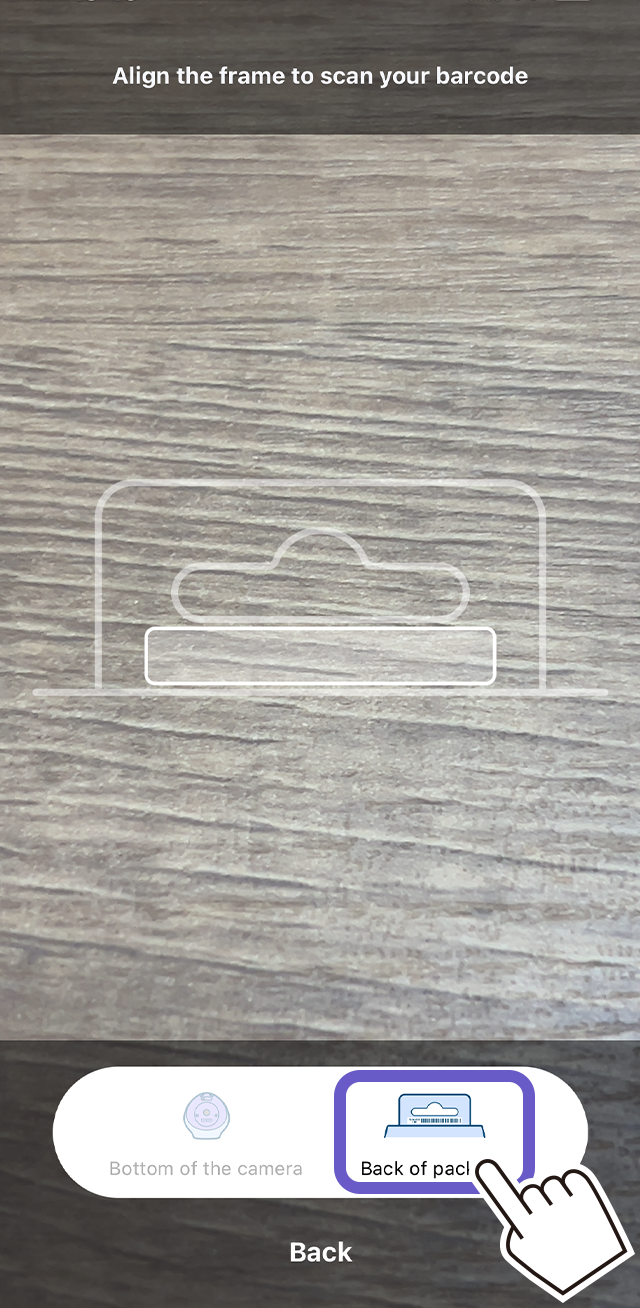
2. To use your smartphone camera to scan the serial number on back of the packaging
1) Tap "Scan with your camera"

2) Select "Back of package", then align to the frame to scan
3) Make sure the number is correct, then tap "OK"
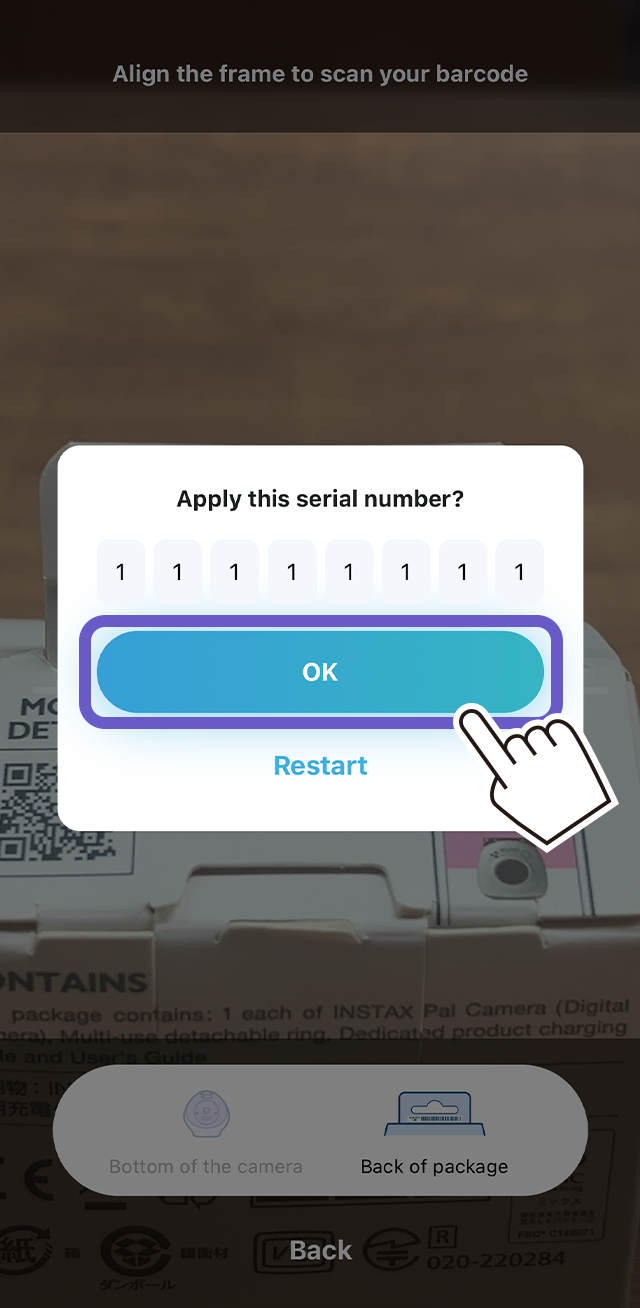
*The scanned number can be adjusted manually.
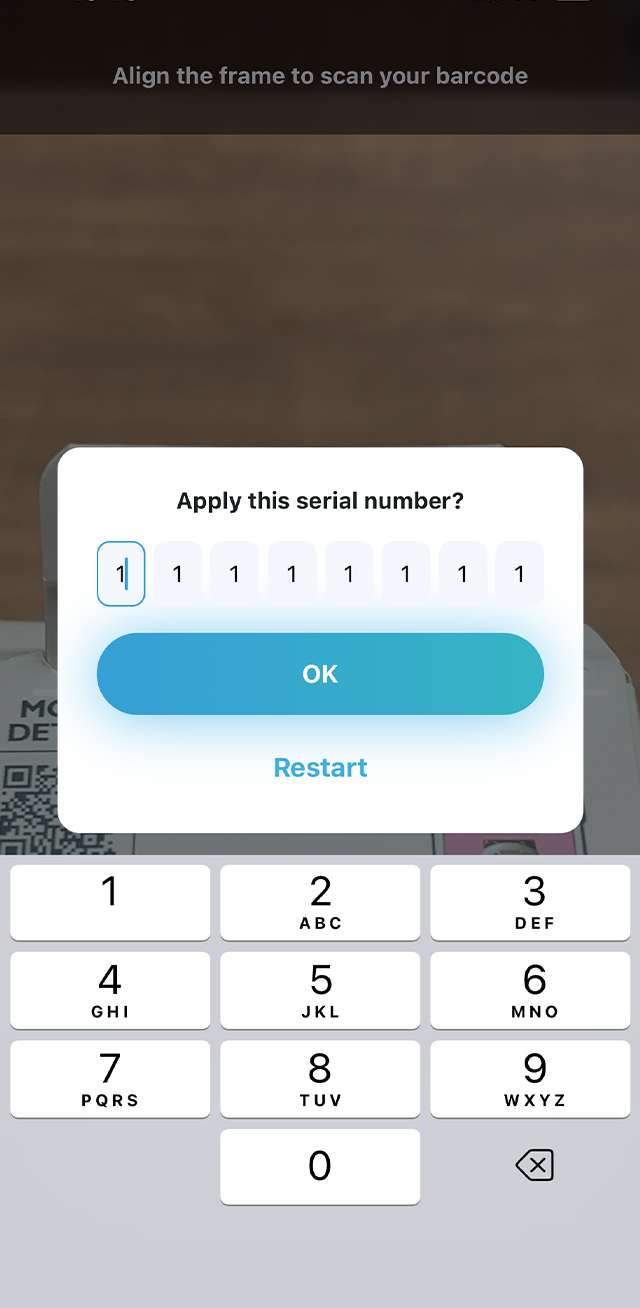
3. To enter manually
1) Tap "Enter manually"
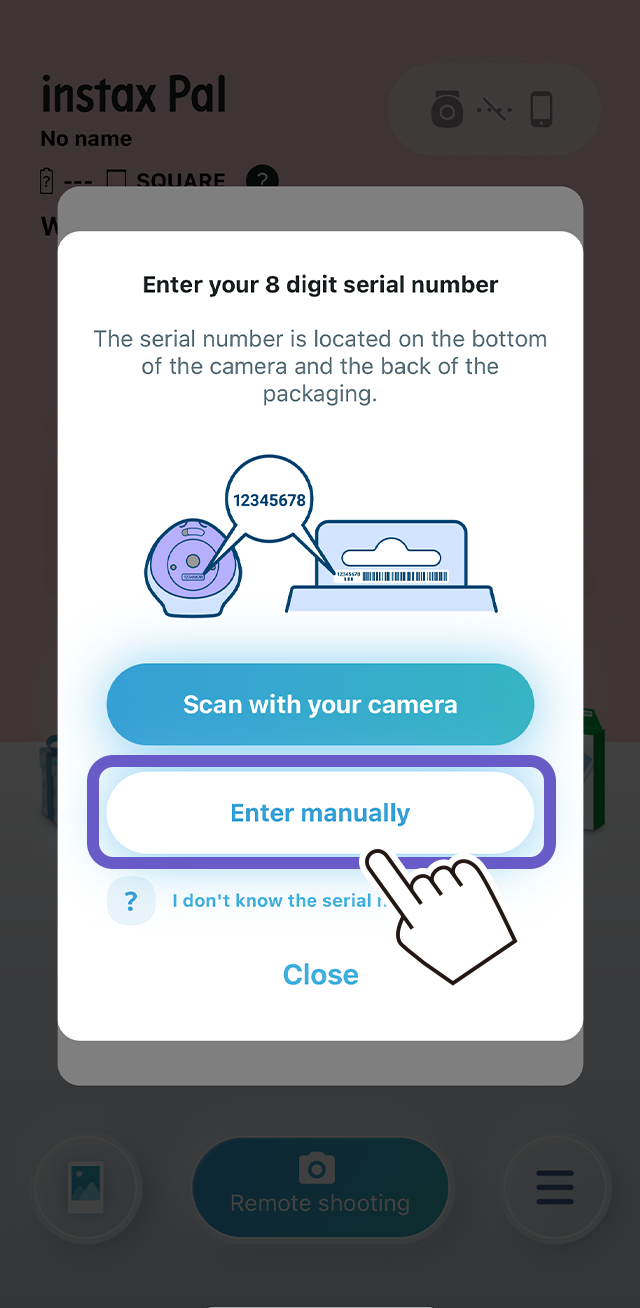
2) Enter your 8 digit serial number, then tap "OK"
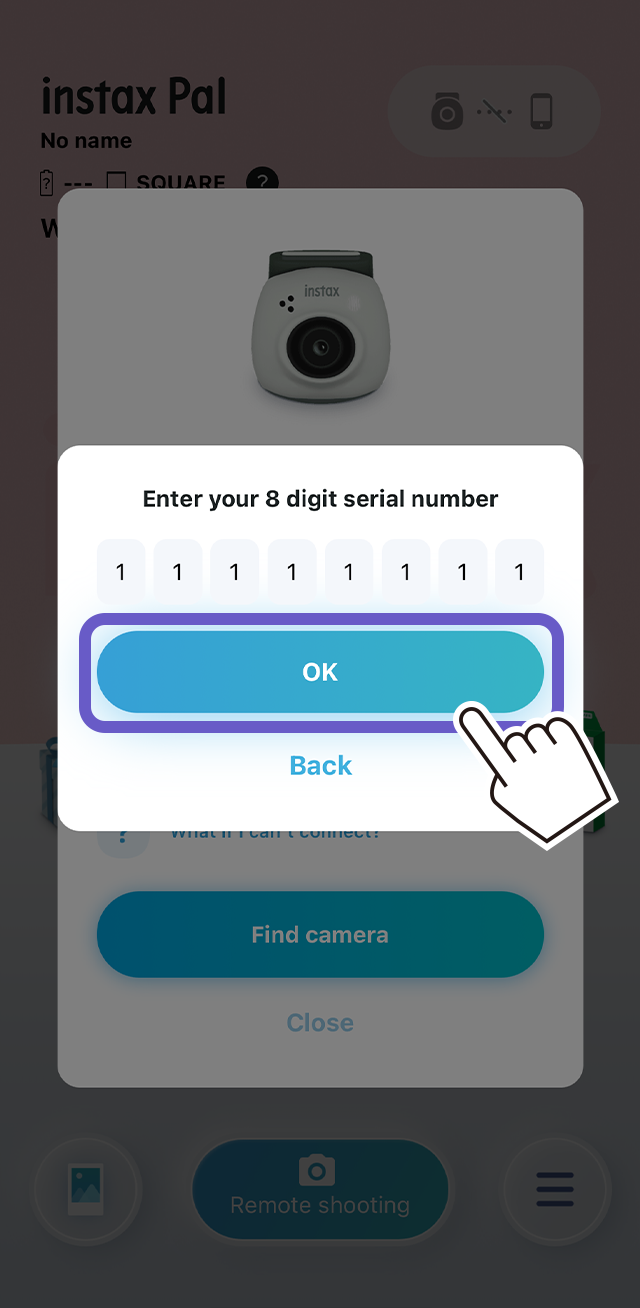
Follow the instructions below.
- Please make sure the bottom switch is in "Fun" mode.
- Turn on “instax Pal™” and check that the LED light color is “white”.
*If the LED light is lit/blinking red, please fully charge for 120 minutes.
For iPhone users:
1. Select "Bluetooth" in "Settings".
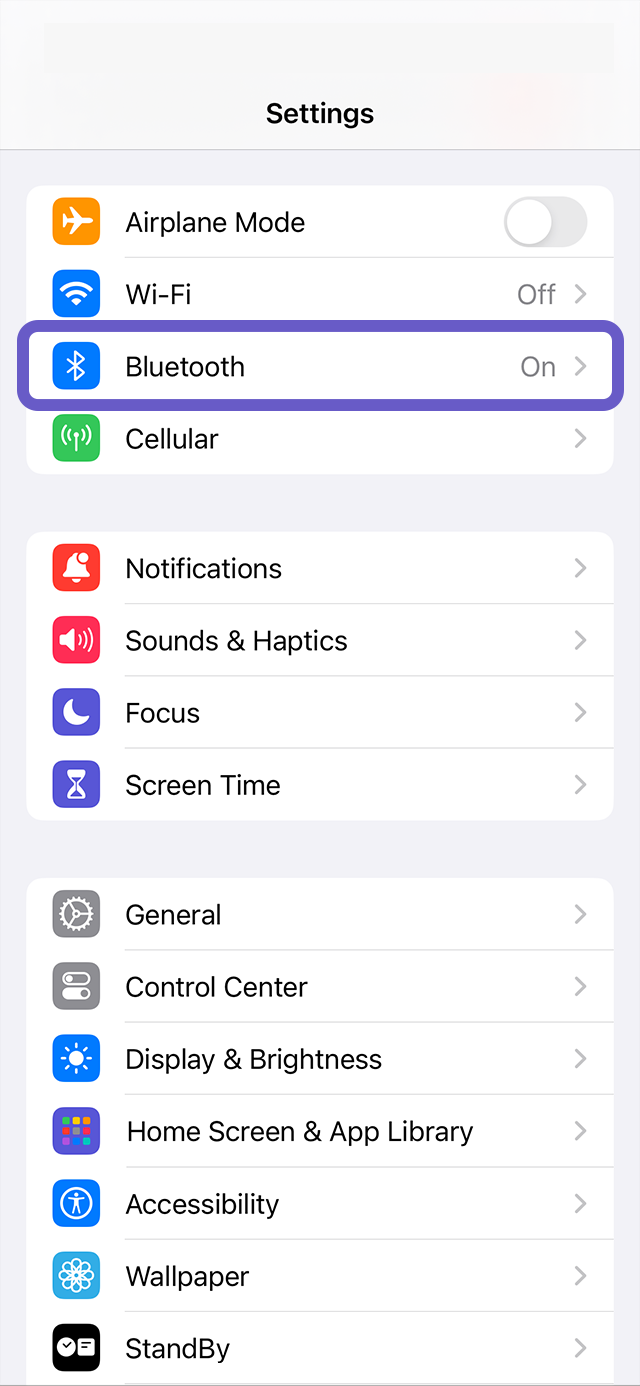
2. If there is a connected device named "INSTAX-XXXXXX (iOS)", tap the (i) icon next to that device.
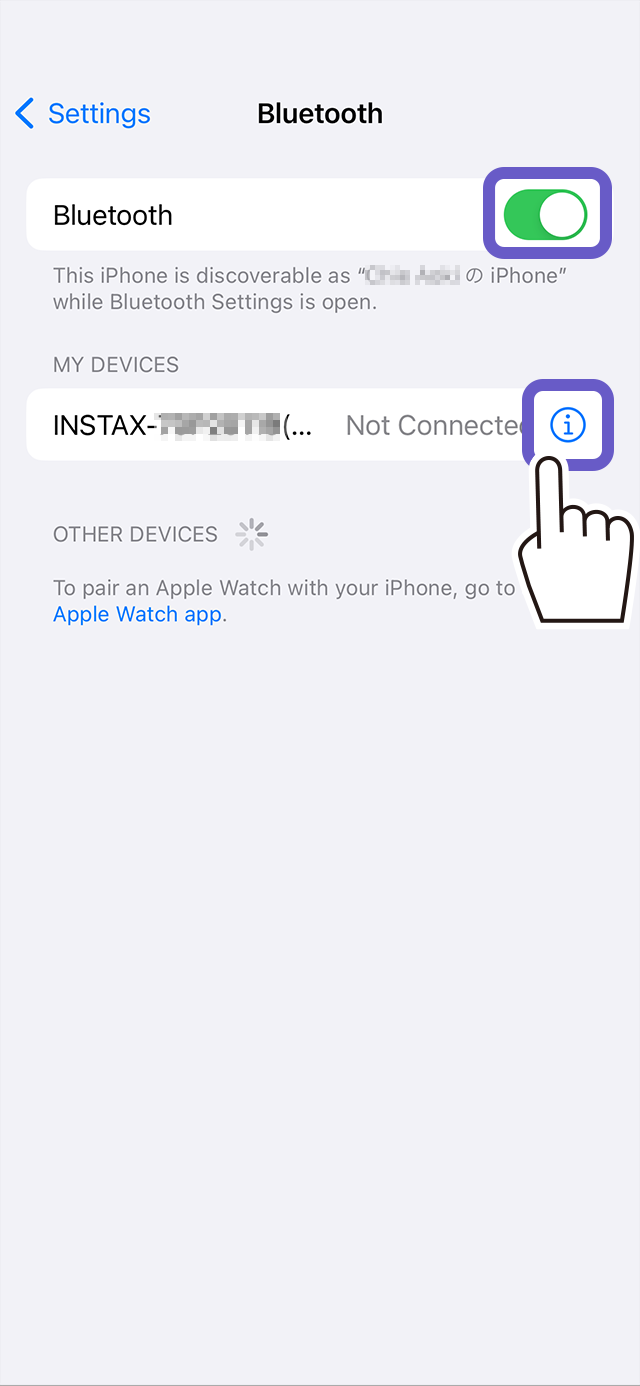
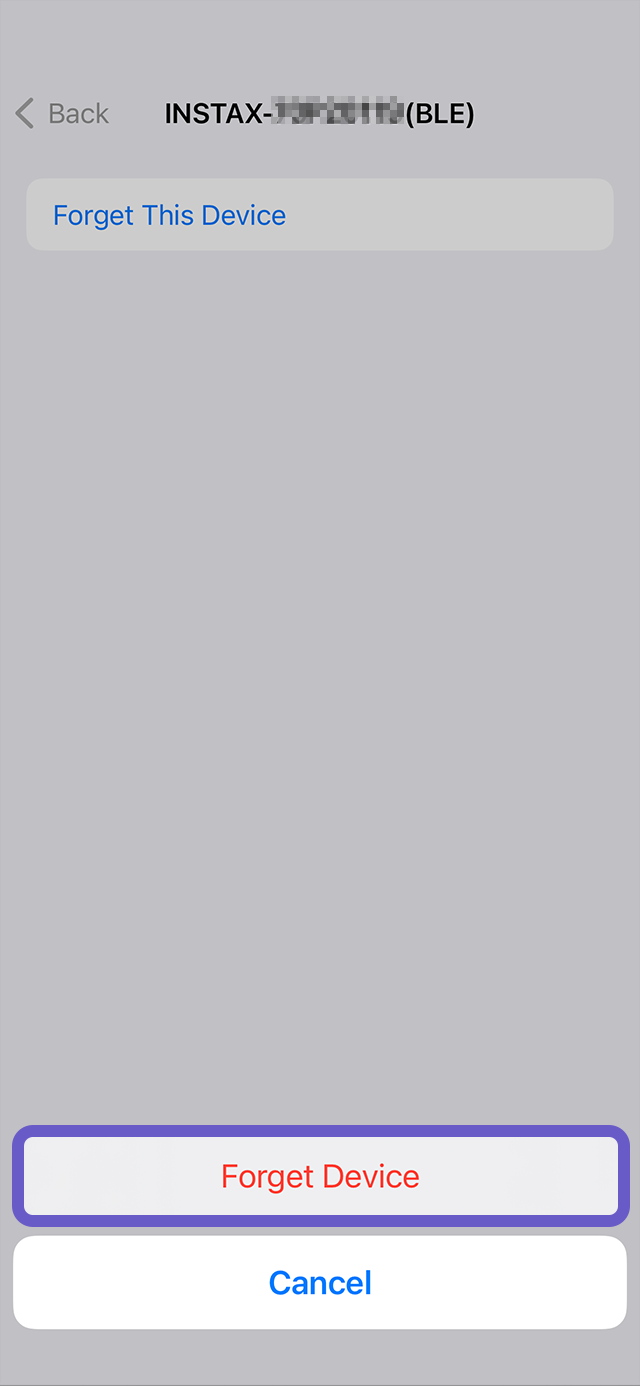
2.1. Select "Forget This Device".

2.2. Select "Forget Device".
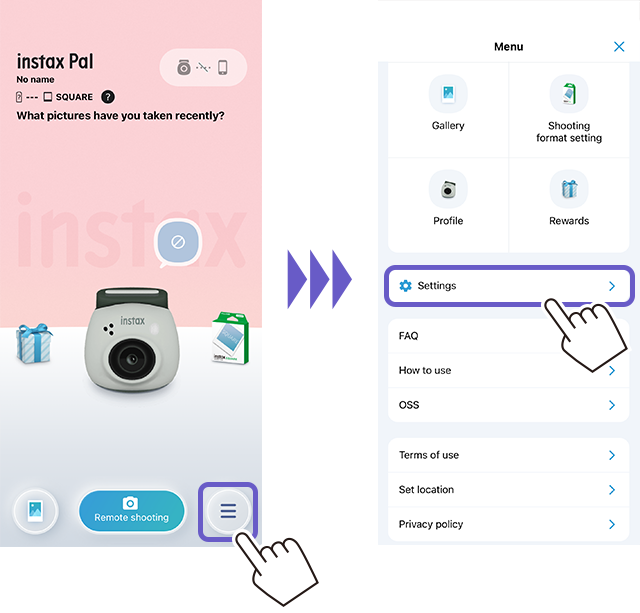
3. Launch the instax Pal™ app, then tap the settings icon.
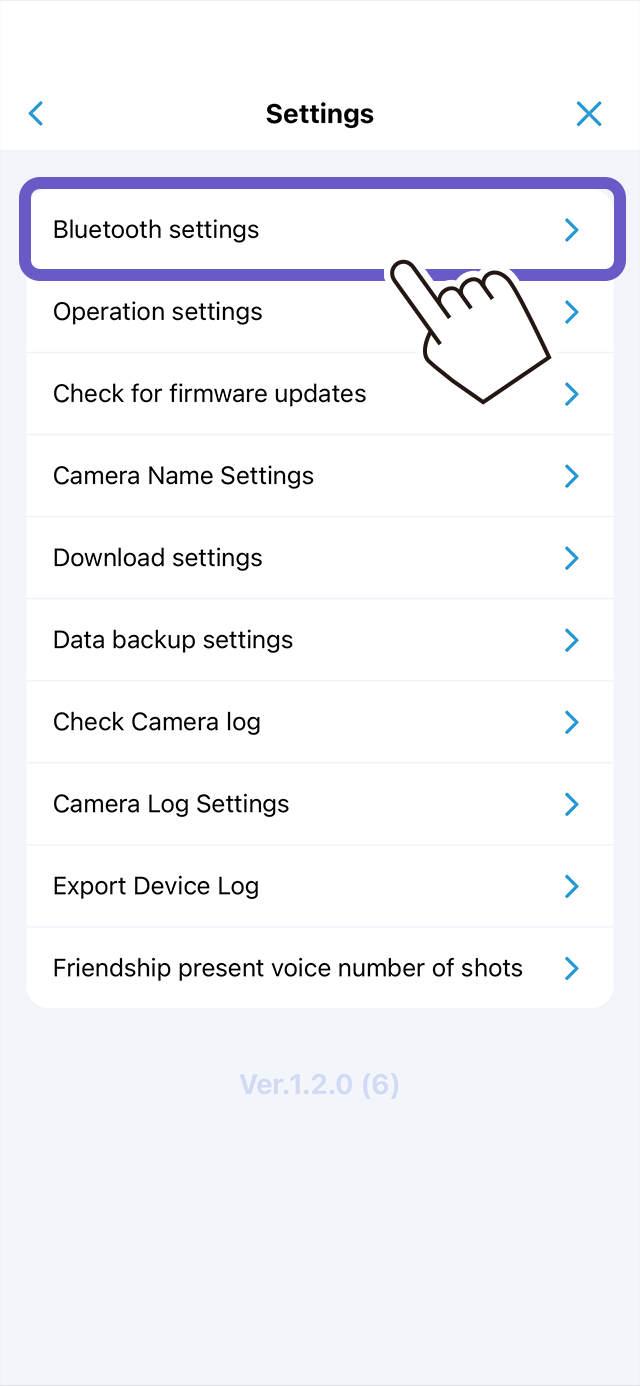
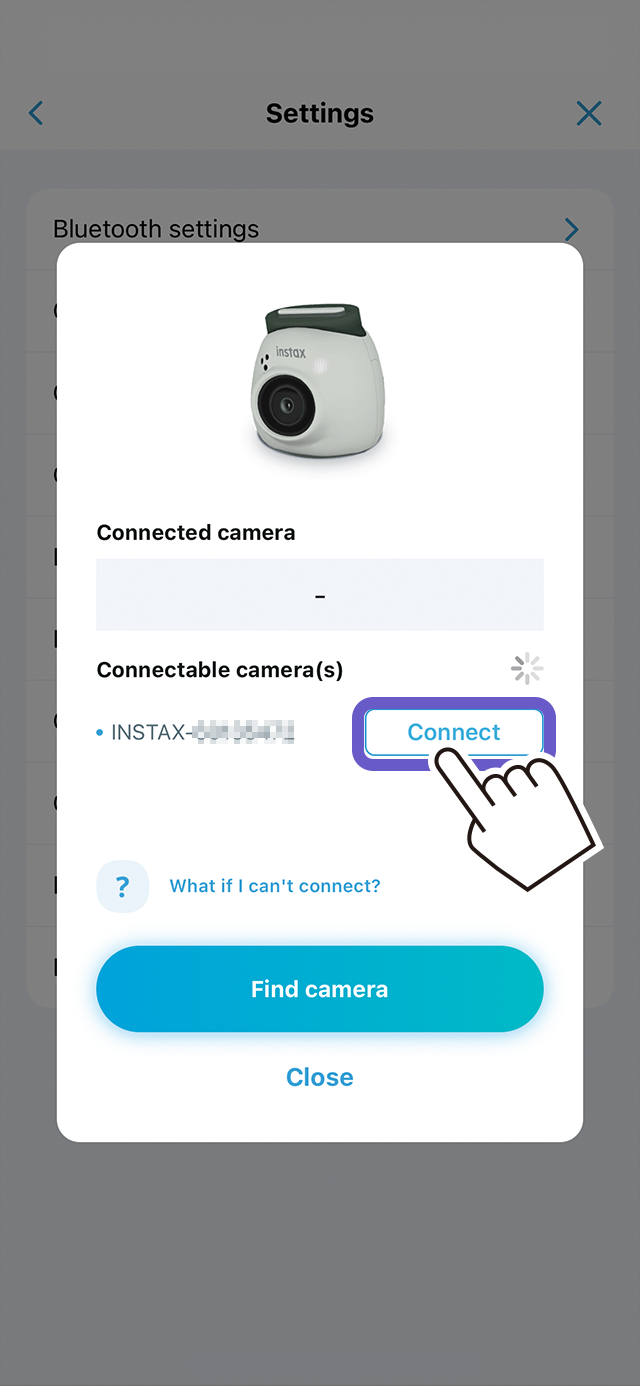
4. Tap "Bluetooth settings".
5. Tap "Connect".
If multiple cameras are shown, select the ID that matches the ID on the bottom of your camera.
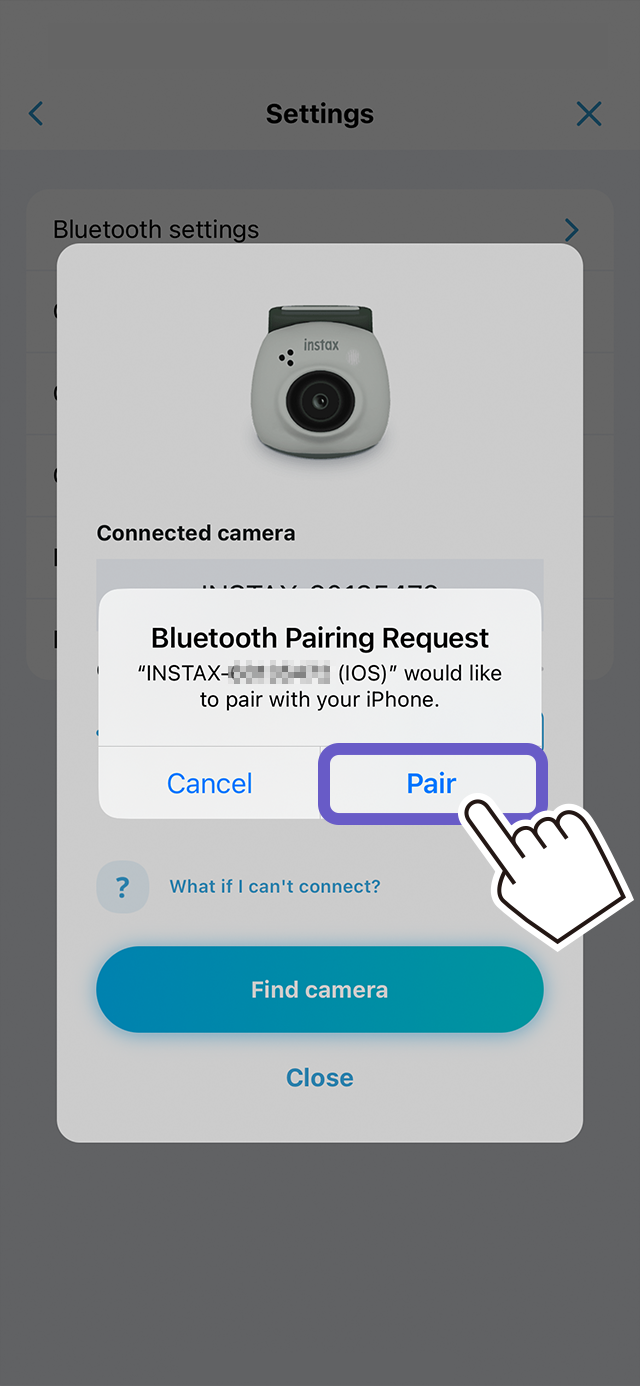
6. Tap "Pair".
For Android users:
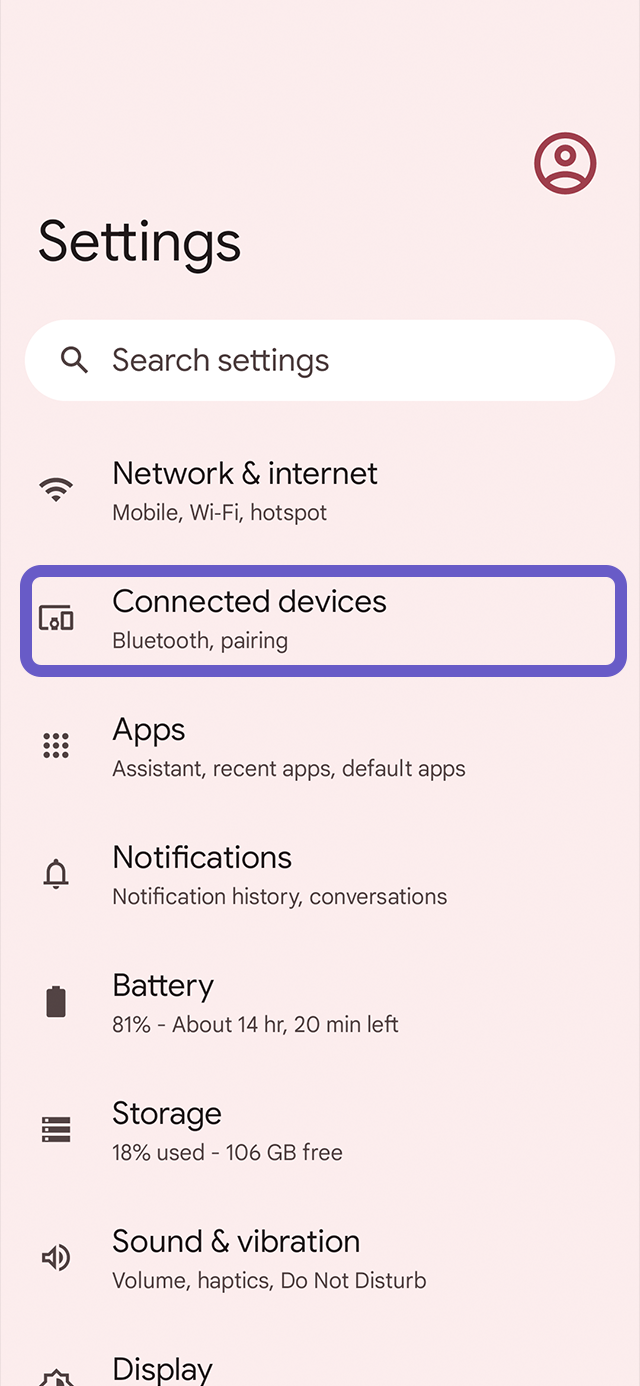
1. Select "Connected devices" in "Settings".
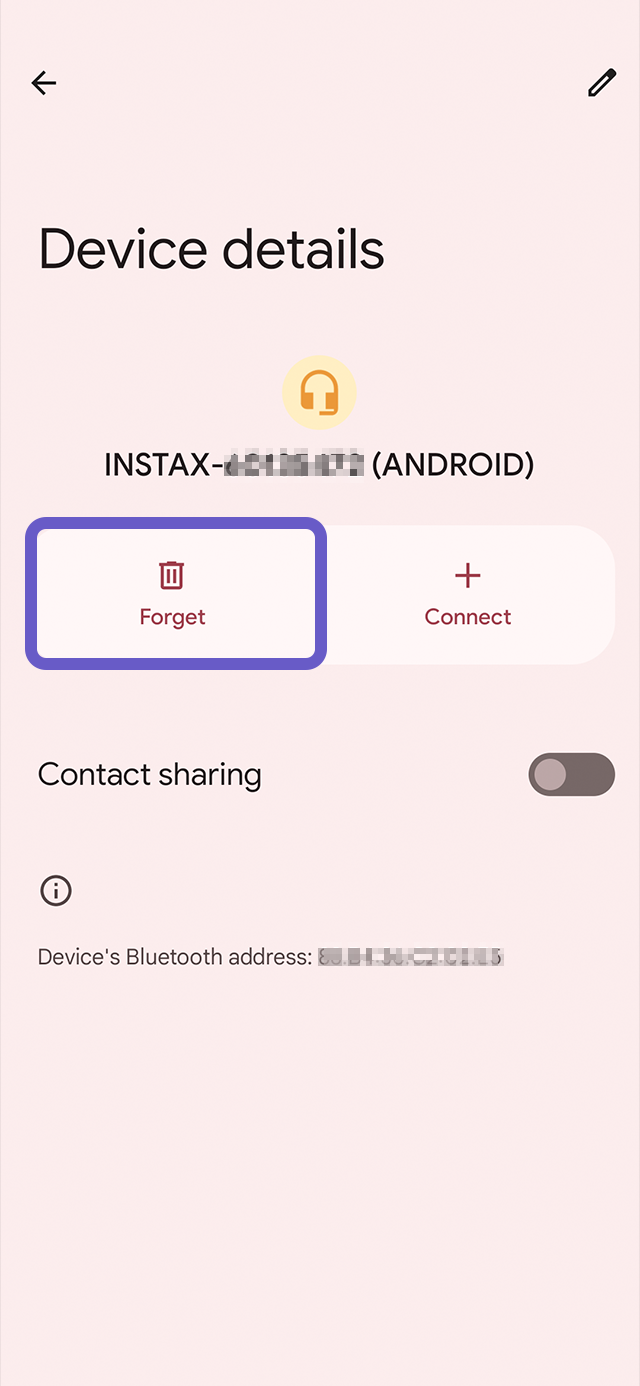
2. If there is a connected device named "INSTAX-XXXXXX (ANDROID)", tap the gear icon next to that device.
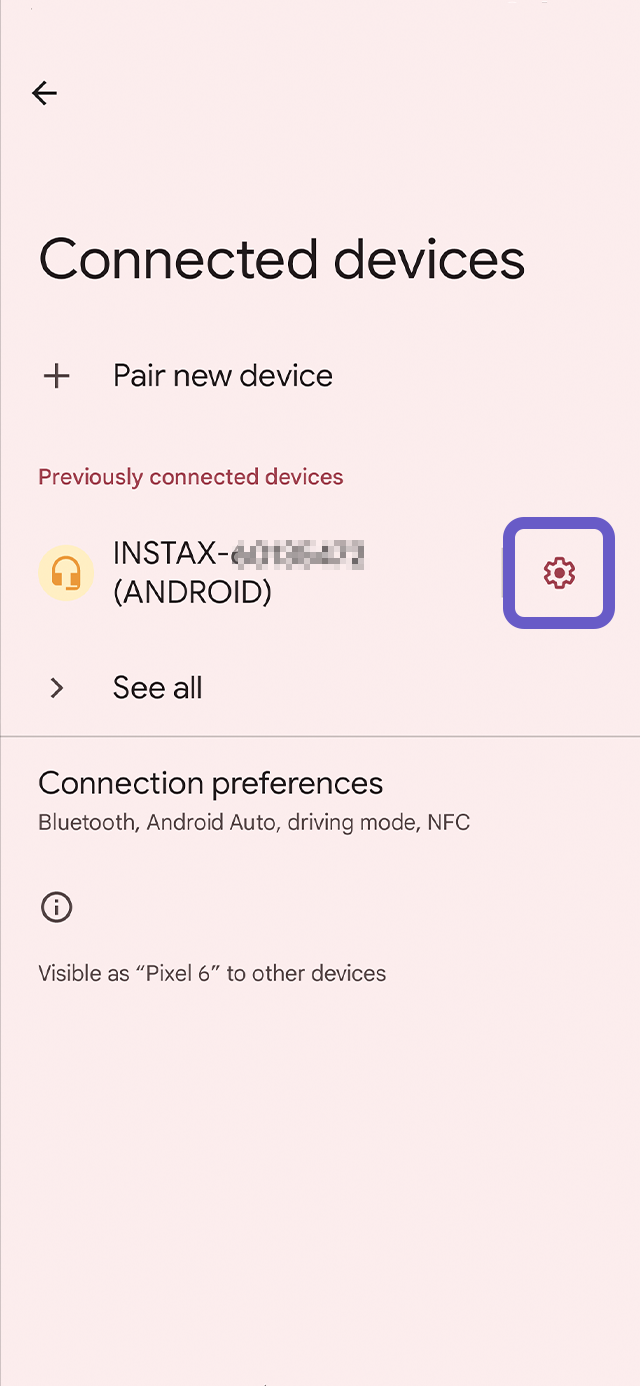
2.1. Select "Forget".
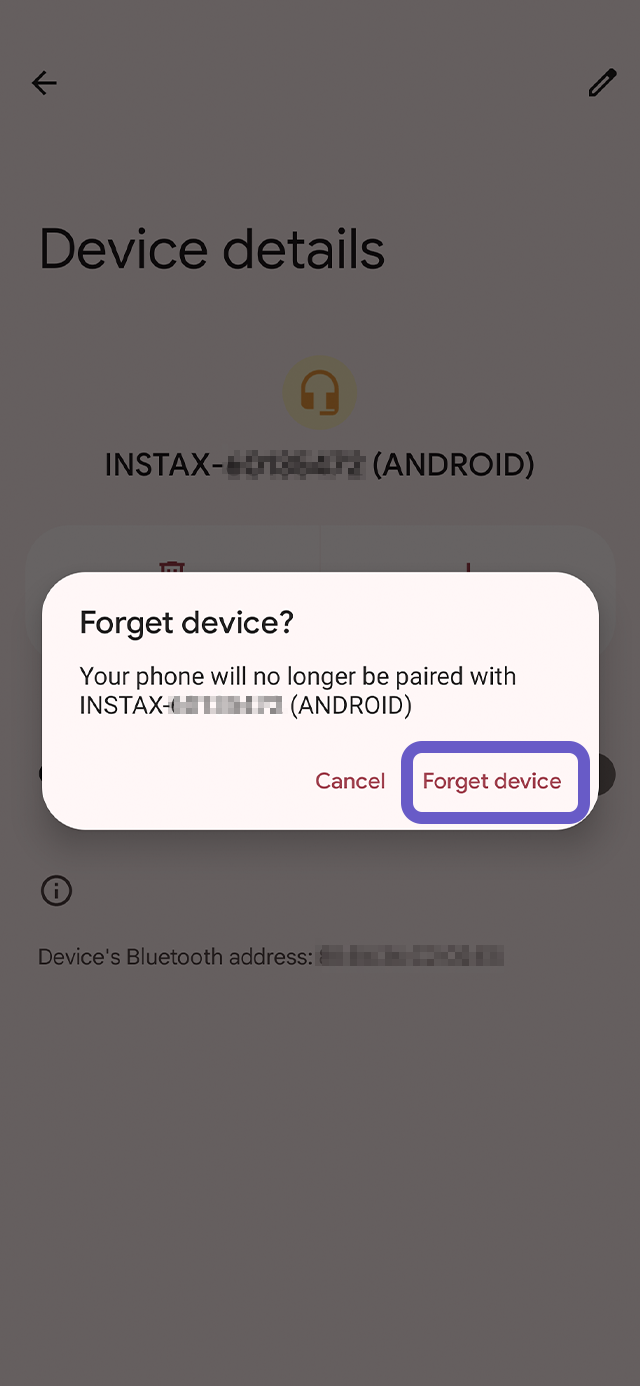
2.2. Select "Forget device".
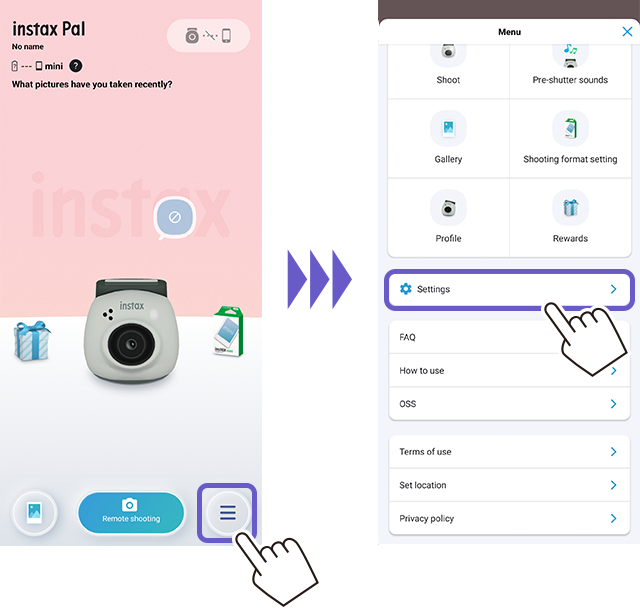
3. Launch the instax Pal™ app, then tap the settings icon.
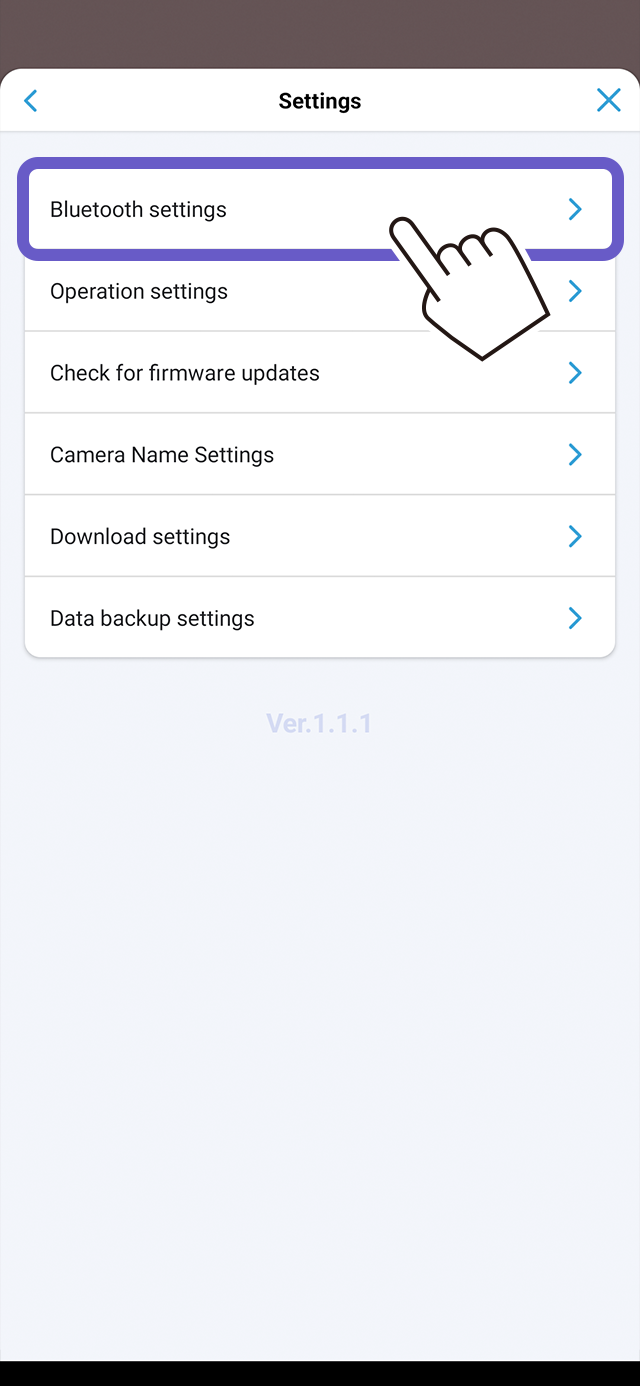
4. Tap "Bluetooth settings".
5. Tap "Connect".
If multiple cameras are shown, select the ID that matches the ID on the bottom of your camera.
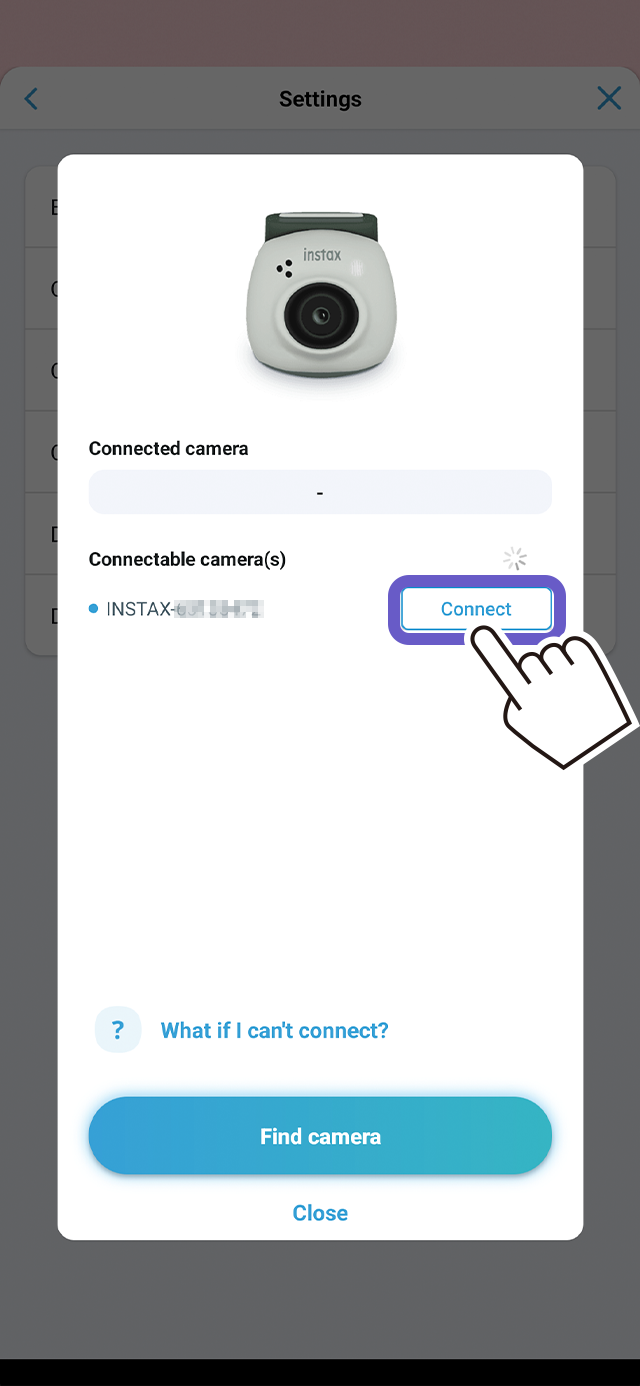
6. Tap the box to add a checkmark next to "Allow access to your contacts and call history", then tap "Pair".
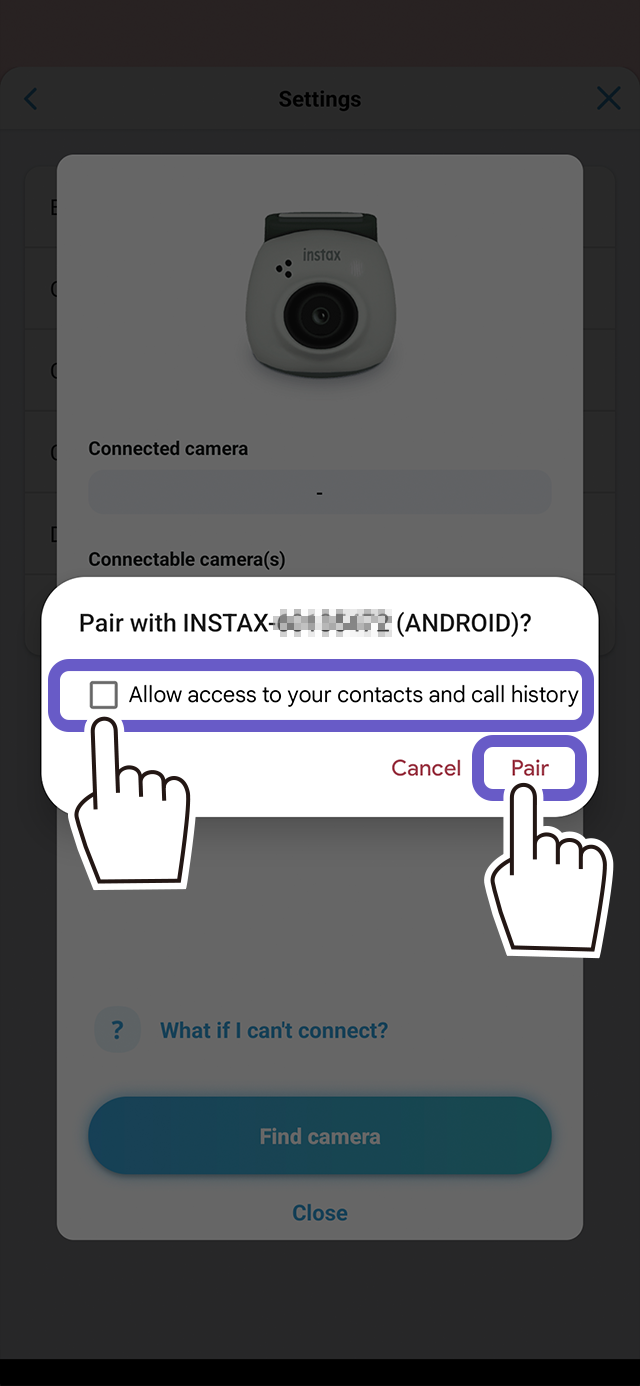
One smartphone can be paired with an instax Pal™ at a time. You can unpair the smartphone to allow another one to pair with the instax Pal™.
The charge light does not light up when instax Pal™ is charging.
The charge light lights up when the power is turned off.
You need to charge your instax Pal™ before using it for the first time.
Charge it for approximately two hours to ensure the battery is full before use.
You can check the status of the camera with the LED.
| LED state | Meaning |
|---|---|
| White pulsing light | Bluetooth connection is not established,and battery level is sufficient |
| Red pulsing light | Bluetooth connection is not established,and battery level is Low |
| Pink light | Displayed whilst taking a photo |
| Purple pulsing light | Transferring images |
| Blue slow flash | Updating firmware |
| Blue fast flash | Firmware update error |
| Yellow fast flash (for 3 seconds) |
The camera’s internal memory or SD card is full. Or the number of untransferred images* from camera to app has reached 50 photos. Connect the camera to the app via Bluetooth and follow the on-screen instructions to save and continue. *You can take up to 50 photos before image transfer to the app is required. • When you transfer images to the app, the image files in the internal memory are deleted (initial setting). You can set it to keep images in the internal memory, however, be aware of the maximum number of images that have not yet been transferred. |
| Yellow light (for 3 seconds) |
The battery level may be very low. If this continues even after charging, contact us. |
| Red fast flash (for 3 seconds) |
A rise in camera temperature has been detected. The camera will automatically power off after 3 seconds. |
| LED state | Meaning |
|---|---|
| Blue pulsing light | Bluetooth connection with smartphone is complete |
| LED state | Meaning |
|---|---|
| Green pulsing light | Bluetooth connection with an instax Link™ printer is complete |
Press the shutter button to shoot. Press & hold the shutter button to take up to 7 consecutive shots.
Press & hold the shutter button to take up to 7 consecutive shots at a time.
Interval shooting is a feature available in the official app that enables continuous shooting at 3-second intervals for 3, 6, 11 or 21 photos.
The instax Animation™ feature combines multiple images into a single video for a visual effect that resembles a flip book.
Scan the QR code on a photo printed with ""Print with QR code"” with your smartphone to play an instax Animation™. Print them out and give them to your friends and family, or share them on social media!
instax Animations™ are automatically created and sent as gifts in the official app in the situations shown below.
They can also be created manually by selecting multiple images from your in-app gallery.
When instax Animations™ are automatically created and sent as gifts:
- After pressing & holding the shutter button to take consecutive shots with instax Pal™
- After Interval shooting
- The day after you took 10 or more photos
There is no maximum number of Pre-shutter sounds that can be recorded on the app.
However, sounds are saved by group, and up to five can be saved per group. The number of groups is also unlimited.
The official app supports three film sizes (formats): "mini", "SQUARE" and "WIDE". The factory default is "mini".
Fun Mode is intended for use when connected to the dedicated app. Link Mode is for printing directly from an instax™ Link series smartphone printer without going through the app.
The included multi-use, detachable ring can be used as a viewfinder to check the approximate area you will capture in a photo, but you won't know for sure until you connect to the official app to check. The anticipation makes it even more fun!
Up to 50 photos can be taken before you need to connect to the app. The more photos are in your camera, the longer it takes to automatically transfer them, so it's best to connect to the app frequently.
The following settings are required to save image data on instax Pal™:
1) Tap the setting icon → [Settings] → [Operation settings] → [Automatic image deletion in thecamera].
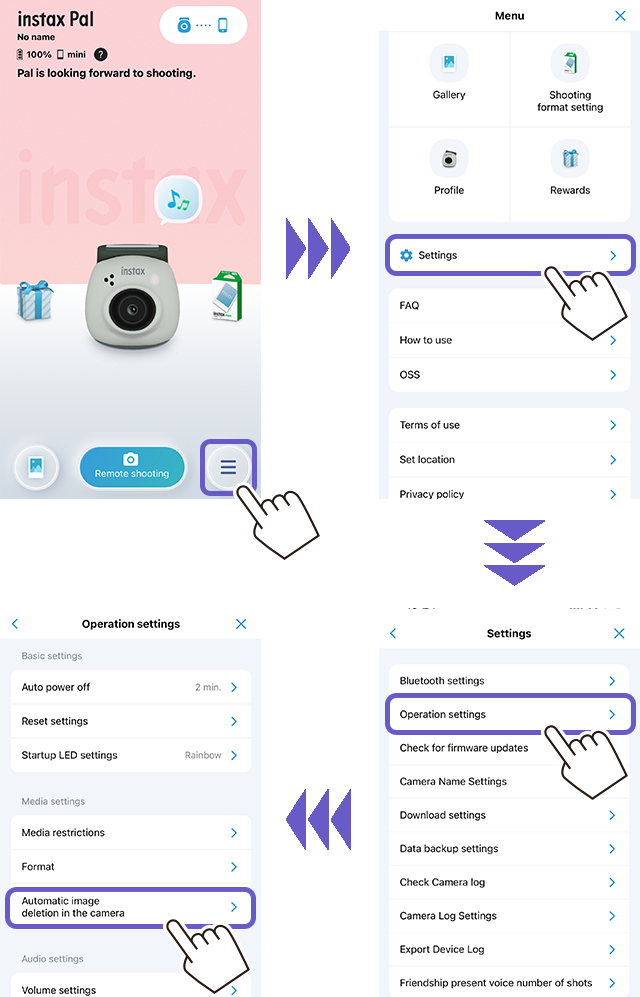
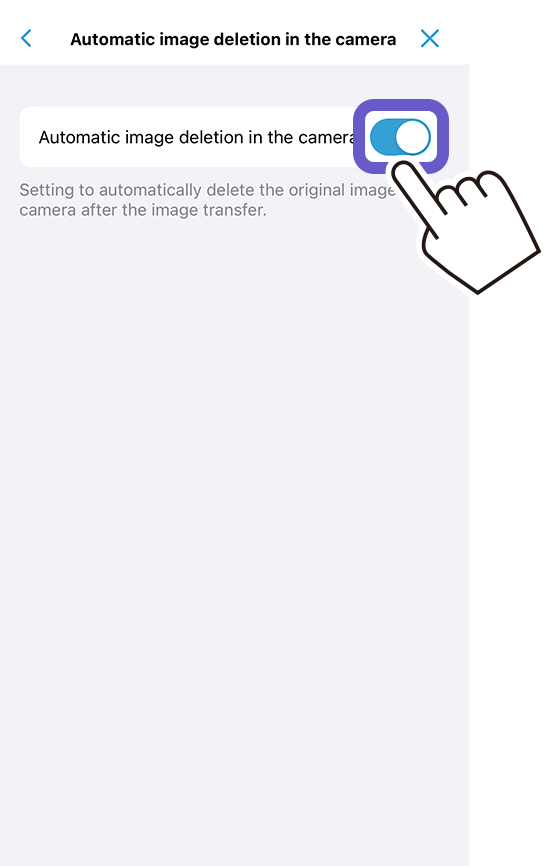
2) Set [Automatic image deletion in the camera] to on/off.
When set to off, the data will remain in the camera even after it has been transferred to the app.
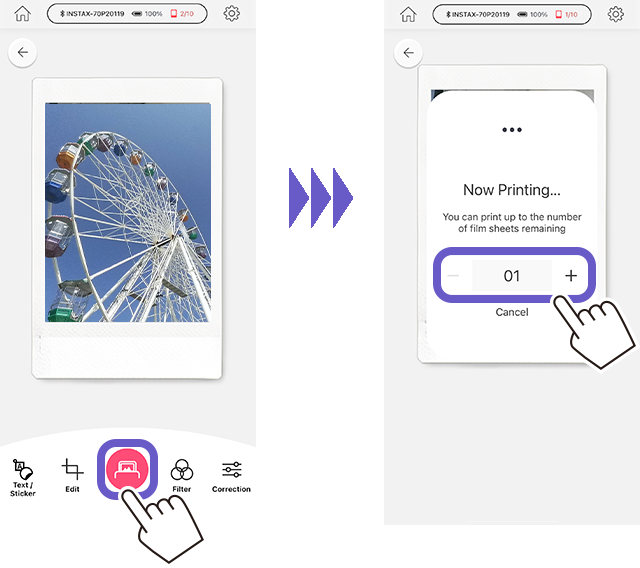
1. Printing from the app:
1) Tap the gallery icon.
Thumbnails of your captured images are displayed.
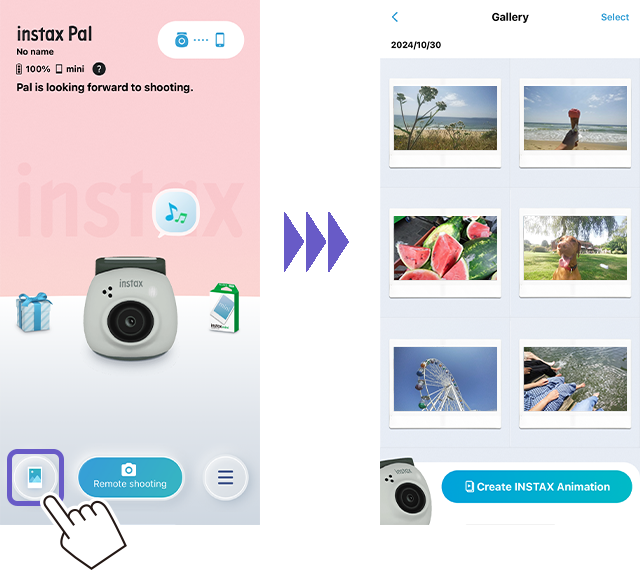
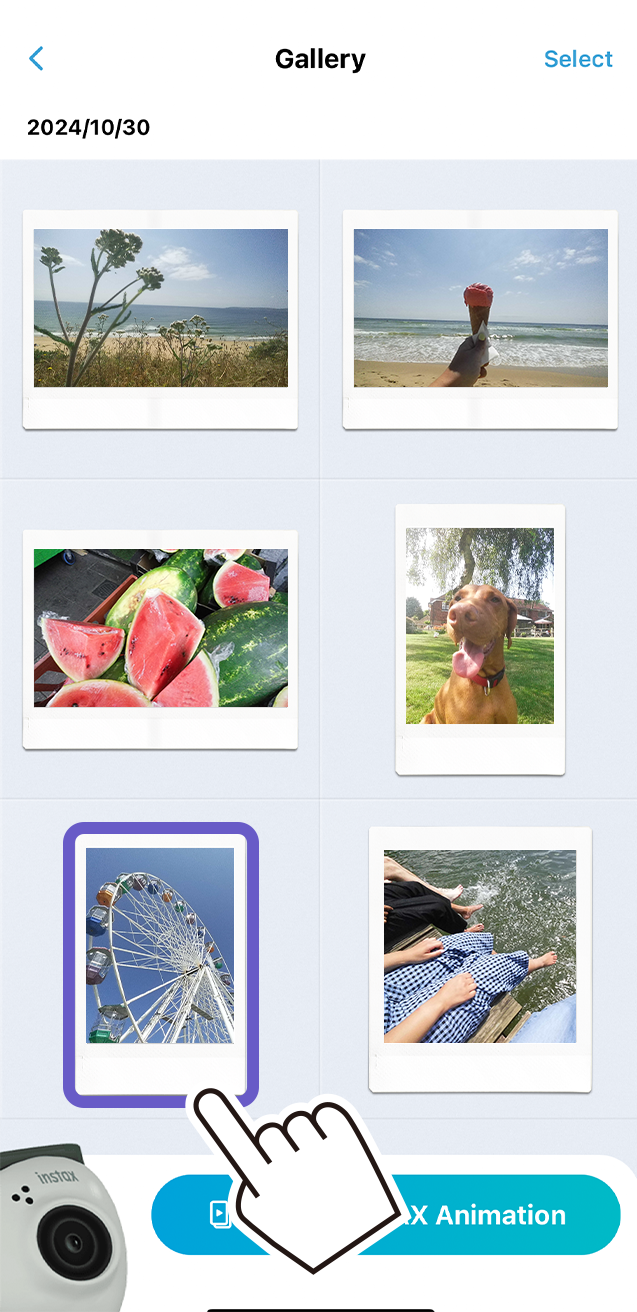
2) Select the photo you want to print.
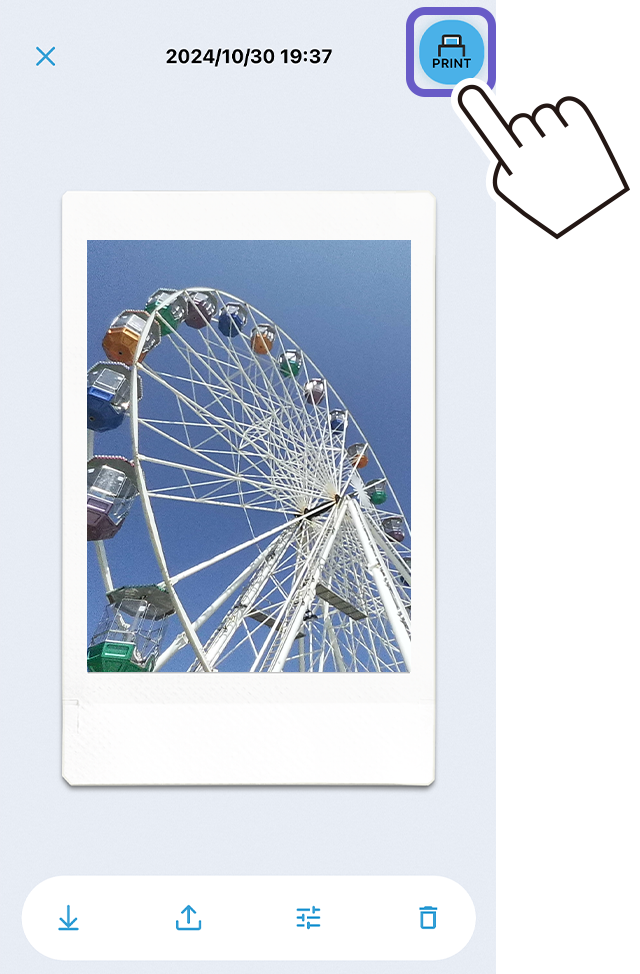
3)Tap[ ].
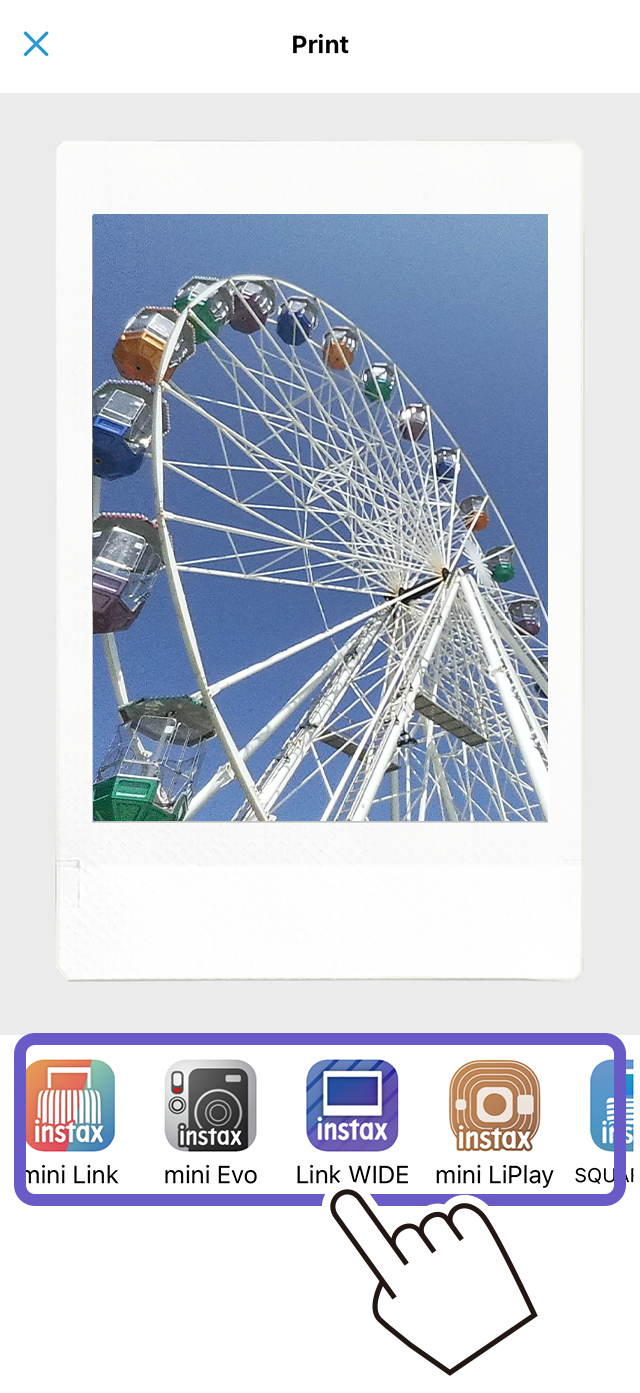
4) Select your device.
The app for the device you have selected will then launch.
5) Tap the print button( )or swipe the screen.
Your image will then print. The number of images to print can also be selected during image transfer.
6) Pair your printer with your smartphone.
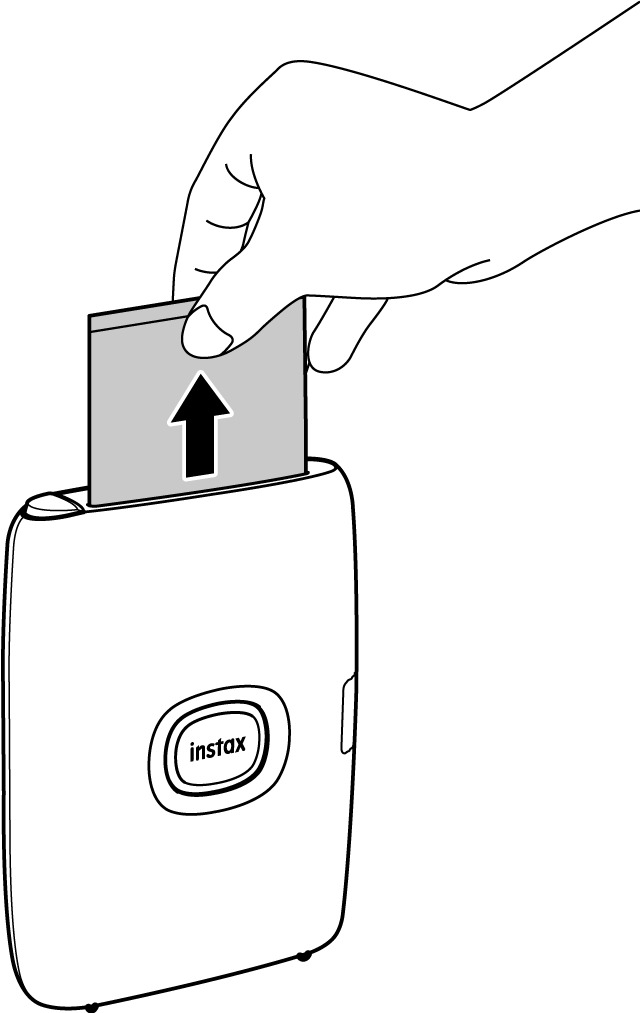
7) Once your image has been printed, you can remove it by grabbing it from the top edge.
The amount of remaining film can be checked on your smartphone.
2. Printing directly from an instax™ Link series smartphone printer without going through the app:
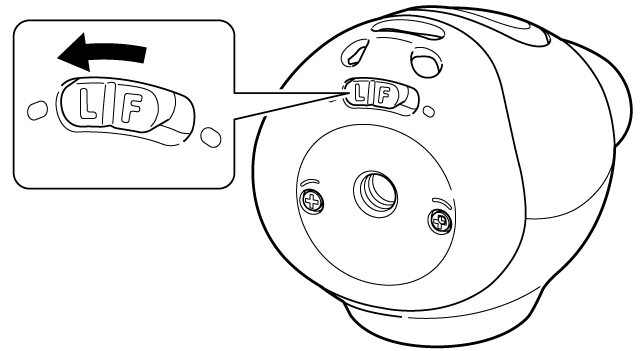
1) Flip the mode selector switch to "L".
The camera enters "Link" Mode.
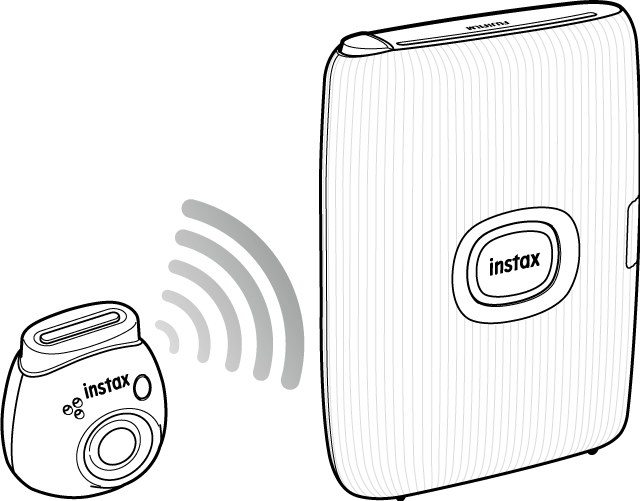
2) Connect the camera to your printer.
When the camera and printer are turned on and placed close to each other, the LED will light up green, and they will connect automatically.
3) Take and print a photo.
After you take a photo with your camera, the image is automatically sent to the printer and printing starts.
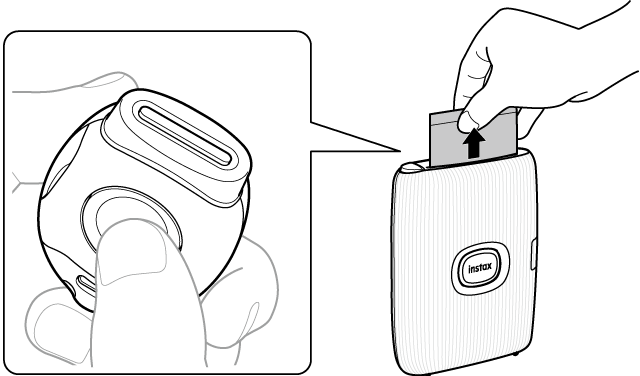
Link Mode supports "instax mini Link™", "instax mini Link2™", "instax mini Link3™", "instax SQUARE Link™" and "instax Link WIDE™".
Make sure the mode selector switch on the bottom of instax Pal™ is set to "L" (Link Mode).

Up to 50 images can be saved in internal memory.
Check the images saved on internal memory or your microSD card by tapping the settings icon on the app's home screen. Next, tap [Settings], [Operation settings], then [Media restrictions].
If the internal memory is full, you must delete images to free up more space.
1 Deleting selected images:
Tap the settings icon on the app's home screen. Next, tap [Settings], [Operation settings], [Media restrictions], then [Internal media]. Select the images you want to delete, then tap [Delete].
2 Deleting all images
Tap the settings icon on the app's home screen. Next, tap [Settings], [Operation settings], [Initialize media], then [Internal media].
Delete images from internal memory by following the steps below:
1 Deleting selected images:
Tap the settings icon on the app's home screen. Next, tap [Settings], [Operation settings], [Media restrictions], then [Internal media]. Select the images you want to delete, then tap [Delete].
2 Deleting all images
Tap the settings icon on the app's home screen. Next, tap [Settings], [Operation settings], [Initialize media], then [Internal media].
- Connect the camera to the official app via Bluetooth to enable automatic transfer of photos you have taken to the app. Photos can be saved as digital instax™ images to make them easy to share on social media.
- The official app's "Remote shooting" feature allows you to take photos with instax Pal™ from your smartphone. "Interval shooting" enables you to take photos continuously in 3-second intervals.
- Record sounds on the official app to use them as pre-shutter sounds. Simply import the sounds from the app to play them from the instax Pal™ speaker when you shoot. The sounds make taking photos even more fun!
- The instax Animation™ feature combines multiple images into a single video for a visual effect that resembles a flip book. Scan a "Print with QR code" photo with your smartphone to play an instax Animation™. Print them out and give them to your friends and family, or share them on social media!
Effects can be applied both before and after shooting.
Click here for details.
Change push notifications in your phone's settings.
Tap the settings icon on the app's home screen. Next, tap [Settings], then [Check for version update] to check for the latest firmware.
To update your instax Pal™ firmware, please follow the steps below.
Notice
- Ensure that your instax Pal™ has 80% battery power or more before updating the firmware.
- The update can take around 10 minutes to complete.
Please do not power off the smartphone or instax Pal™ until it has finished. - If your instax Pal™ 's internal memory or Micro SD card has any images that have not been transferred to the instax™ Smartphone App, you will need to transfer all images before updating the firmware.
How to update your firmware
1) Update the instax Pal™ smartphone App.
2) Tap the setting icon → [Settings] → [Check for firmware updates] → [OK]
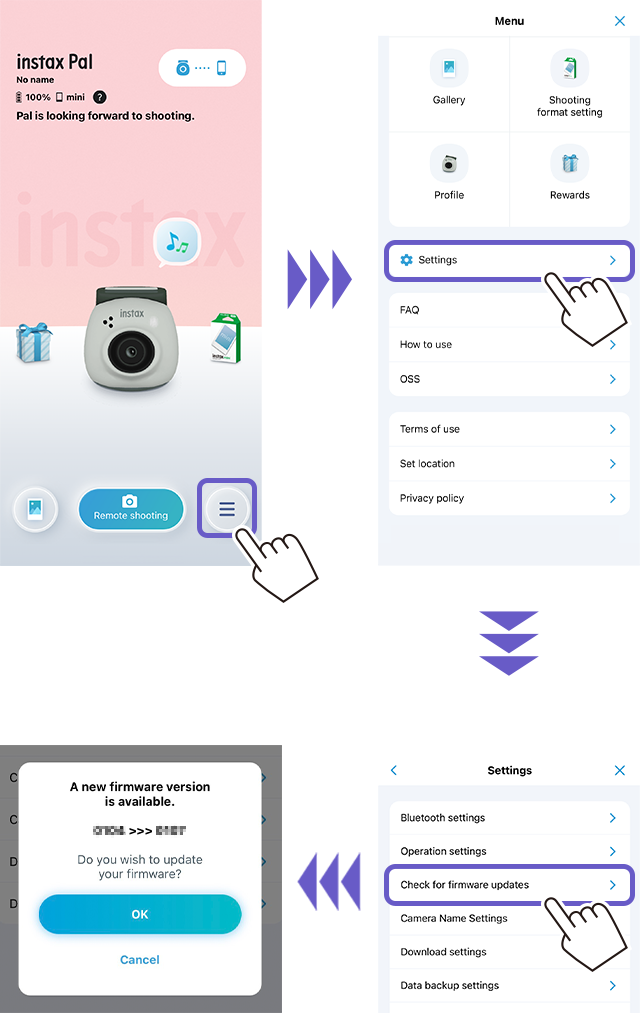
3) The firmware will begin installing. The camera’s LED will change from a blue pulsing light to a blue slow flash.
(LED blue slow flash during camera firmware installation)
4) Around ten minutes later, the camera will reboot and its LED turns into a blue pulsing light, the App's screen will display ‘finished’.
If the LED turns blue rapidly, the update was not a success, please charge the camera and try the process again.
5) To check your firmware version, tap the [Check for firmware updates] on the App’s [settings] screen.
Automatically created instax Animations™ are sent as "presents" in the following situations:
- After pressing & holding the shutter button to take consecutive shots with instax Pal™
- After Interval shooting
- The day after you took 10 or more photos


