- Home
- New Features
- Other Fun Features
- Product Specifications
- FAQ
- Manual
- App
- 7 COMPOSITION TIPS
You need to charge your SQUARE Link before using it for the first time. Charge it for about two hours to make sure the battery is full before use.
Follow the procedure below.
- Open the Bluetooth settings screen of a smartphone other than the one you wish to connect. Check if any previously-connected Links are displayed. Links are displayed as INSTAX-XXXXXXX. Delete any Links that are displayed.
- Restart the smartphone that you wish to connect.
- Turn on Bluetooth via the smartphone's settings (if Bluetooth is already turned on, turn it off then on again).
- Turn on the SQUARE Link
- Open the SQUARE Link App on the smartphone, select Bluetooth.
The SQUARE Link can now be paired with the Link App.
Your smartphone OS will request the following permissions when the instax SQUARE Link™ app is opened for the first time after installing or updating the app. Some or all of the app’s functions may be unavailable if these permissions are not granted. Check your current settings and adjust as required.
For iPhone users:
- Tap the “Settings” button on the home screen.
- Tap “Bluetooth”.
- Move the “Bluetooth” slider from off (left) to on (right).
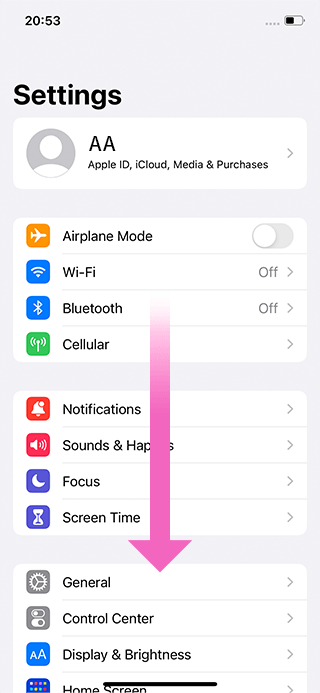
- Return to “Settings”.
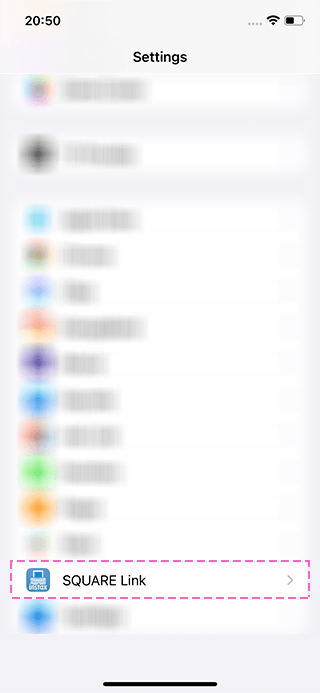
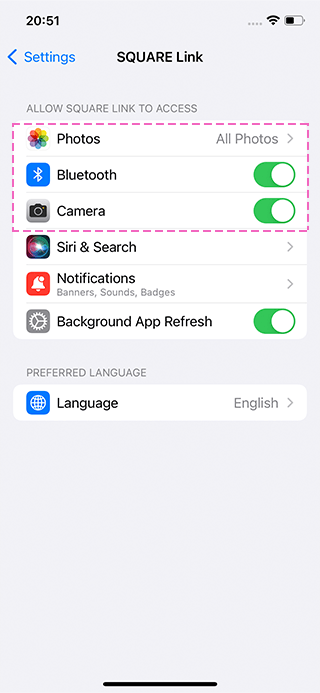
- Scroll down to the “SQUARE Link” icon and tap on the icon.
- Check that the “Photos”, “Bluetooth”, “Microphone” and “Camera” permissions are set as shown below.
| iOS 15 or later | iOS 14 | |
|---|---|---|
| “Photos” permissions | Select “All photos” | Select “All photos” |
| “Bluetooth” permissions | Slide right | Slide right |
| “Microphone” permissions | Slide right | - |
| “Camera” permissions | Slide right | Slide right |
| iOS 15 or later | |
|---|---|
| “Photos” permissions | Select “All photos” |
| “Bluetooth” permissions | Slide right |
| “Microphone” permissions | Slide right |
| “Camera” permissions | Slide right |
| iOS 14 | |
|---|---|
| “Photos” permissions | Select “All photos” |
| “Bluetooth” permissions | Slide right |
| “Microphone” permissions | - |
| “Camera” permissions | Slide right |
For Android users:
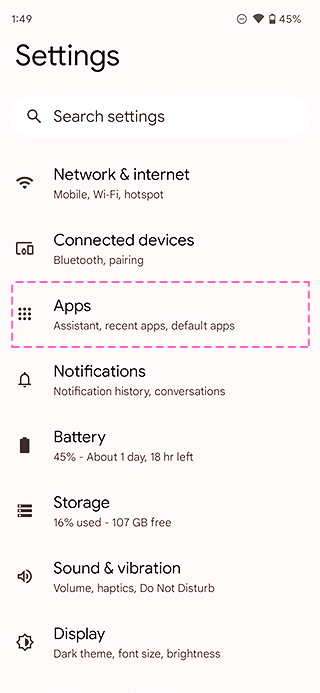
- Tap the “Settings” button on the home screen.
- Tap “Connected devices”.
- Tap “Connections”.
- Tap “Bluetooth”.
- Move the “Bluetooth” slider from off (left) to on (right).
- Tap the “←” on the upper left of the screen three times to return to “Settings”.
- Tap “Location”.
- Move the “Use location” slider from off (left) to on (right).
- Tap the “←” on the upper left of the screen to return to “Settings”.
- Android 11 or earlier: Tap “Apps & notifications”.
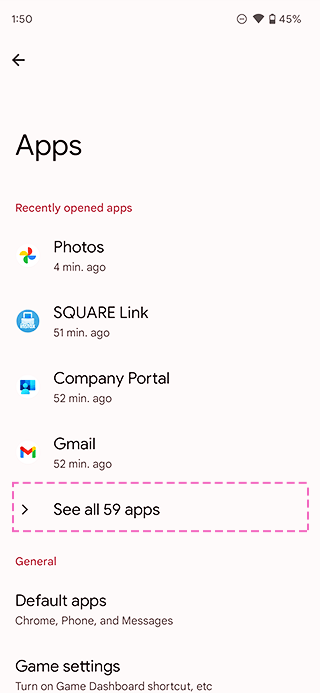
- Android 12: Tap “Apps”.
- Tap “Display all apps”.
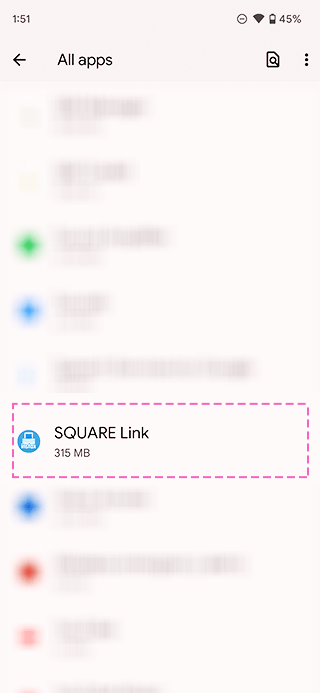
- Scroll down to the “SQUARE Link” icon and tap on the icon.
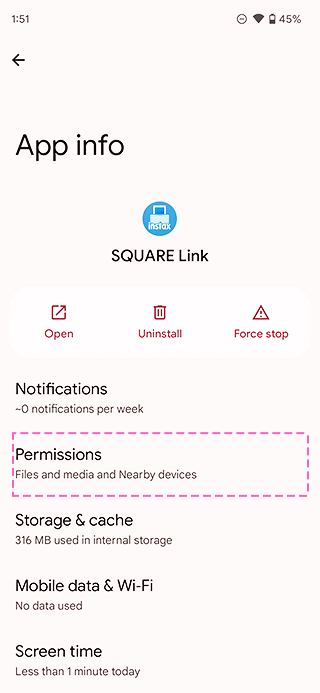
- Tap “Permissions”.
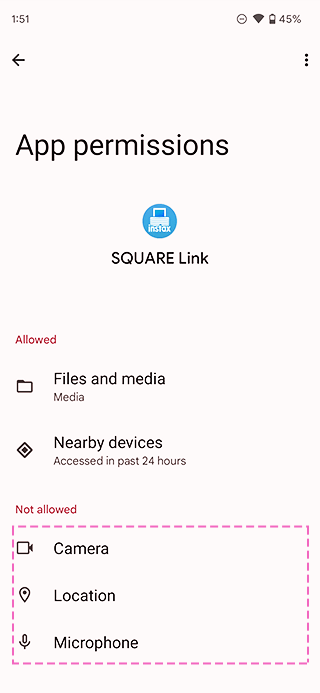
- Check that the “Camera”, “Files and media/Storage” and “Location” permissions are set as shown below.
| Android 13 | Android 12 | Android 11 | Android 10 | Android 9 or earlier | |
|---|---|---|---|---|---|
| “Camera” permissions | Select “Allow only while using the app” | Select “Allow only while using the app” | Select “Allow only while using the app” | Select “Allow” | Slide right |
| “Microphone” permissions | Select “Allow only while using the app” | Select “Allow only while using the app” | - | - | - |
| “Files and media” permissions | - | Select “Allow media access only” | Select “Allow media access only” | - | - |
| “Music and audio” permissions | Select “Allow” | - | - | - | - |
| “Photos and videos” permissions | Select “Allow” | - | - | - | - |
| “Storage” permissions | - | - | - | Select “Allow” | Slide right |
| “Location” permissions | Select “Allow only while using the app”, then move the "Use precise location" slider to the right | Select “Allow only while using the app”, then move the "Use precise location" slider to the right | Select “Allow only while using the app” | Select “Allow only while using the app” | Slide right |
| “Nearby devices” permissions | Select “Allow” | Select “Allow” | - | - | - |
| “Notifications” permissions | Move all sliders to the right | Move all sliders to the right *Set directly under app information |
- | - | - |
| Android 13 | |
|---|---|
| “Camera” permissions | Select “Allow only while using the app” |
| “Microphone” permissions | Select “Allow only while using the app” |
| “Files and media” permissions | - |
| “Music and audio” permissions | Select “Allow” |
| “Photos and videos” permissions | Select “Allow” |
| “Storage” permissions | - |
| “Location” permissions | Select “Allow only while using the app”, then move the "Use precise location" slider to the right |
| “Nearby devices” permissions | Select “Allow” |
| “Notifications” permissions | Move all sliders to the right |
| Android 12 | |
|---|---|
| “Camera” permissions | Select “Allow only while using the app” |
| “Microphone” permissions | Select “Allow only while using the app” |
| “Files and media” permissions | Select “Allow media access only” |
| “Music and audio” permissions | - |
| “Photos and videos” permissions | - |
| “Storage” permissions | - |
| “Location” permissions | Select “Allow only while using the app”, then move the "Use precise location" slider to the right |
| “Nearby devices” permissions | Select “Allow” |
| “Notifications” permissions | Move all sliders to the right *Set directly under app information |
| Android 11 | |
|---|---|
| “Camera” permissions | Select “Allow only while using the app” |
| “Microphone” permissions | - |
| “Files and media” permissions | Select “Allow media access only” |
| “Music and audio” permissions | - |
| “Photos and videos” permissions | - |
| “Storage” permissions | - |
| “Location” permissions | Select “Allow only while using the app” |
| “Nearby devices” permissions | - |
| “Notifications” permissions | - |
| Android 10 | |
|---|---|
| “Camera” permissions | Select “Allow” |
| “Microphone” permissions | - |
| “Files and media” permissions | - |
| “Music and audio” permissions | - |
| “Photos and videos” permissions | - |
| “Storage” permissions | Select “Allow” |
| “Location” permissions | Select “Allow only while using the app” |
| “Nearby devices” permissions | - |
| “Notifications” permissions | - |
| Android 9 or earlier | |
|---|---|
| “Camera” permissions | Slide right |
| “Microphone” permissions | - |
| “Files and media” permissions | - |
| “Music and audio” permissions | - |
| “Photos and videos” permissions | - |
| “Storage” permissions | Slide right |
| “Location” permissions | Slide right |
| “Nearby devices” permissions | - |
| “Notifications” permissions | - |
Follow the instructions below
For iPhone users:
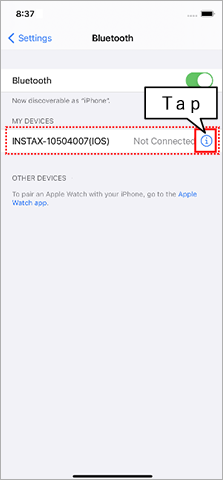
1. Select "Bluetooth" in "Settings".
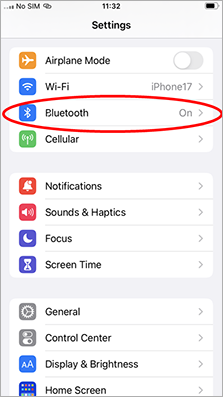
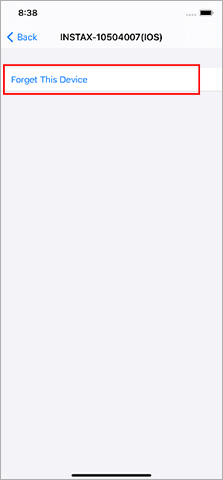
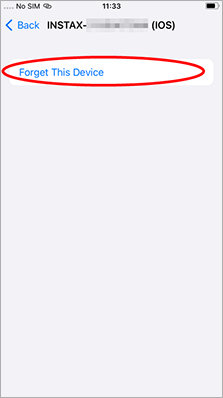
2. If there is a connected device named "INSTAX-XXXXXX (iOS)", tap the (i) icon next to that device.
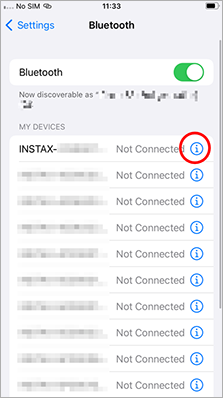
2.1. Select "Forget This Device".
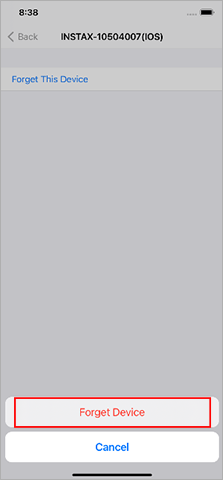
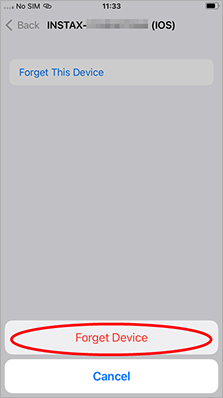
2.2. Select "Forget Device".
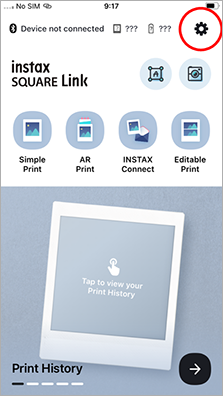
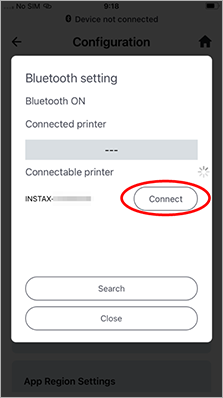
3. Launch the instax SQUARE Link™ app, then tap the gear icon.
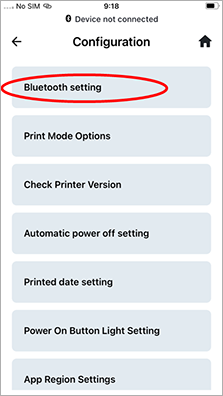
4.Tap "Bluetooth settings".
5.「Tap "Connect".
If multiple printers are shown, select the ID that matches the ID on the bottom of your printer.
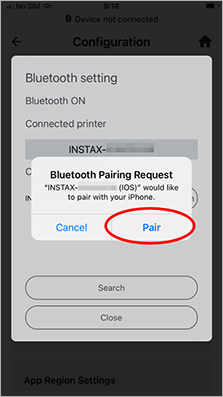
6. Tap "Pair".
For Android users:
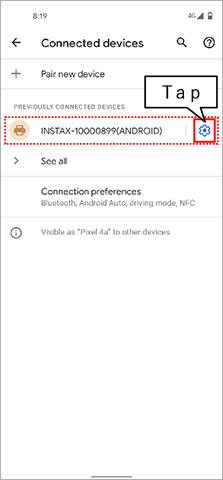
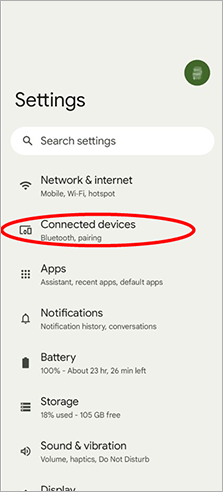
1. Select "Connected devices" in "Settings".
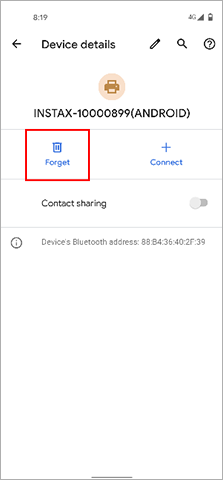
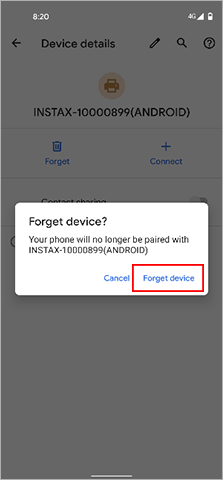
2. If there is a connected device named "INSTAX-XXXXXX (ANDROID)", tap the gear icon next to that device.
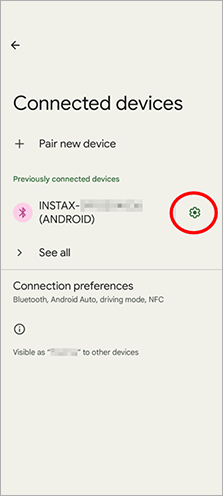
2.1. Select "Forget".
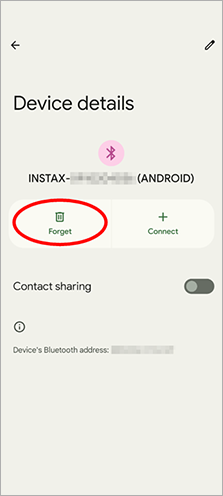
2.2. Select "Forget device".
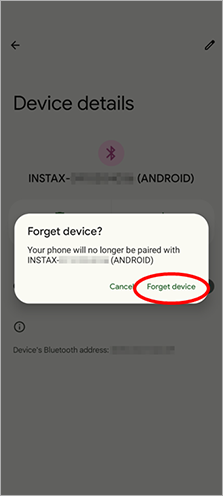
3. Launch the instax SQUARE Link™ app, then tap the gear icon.
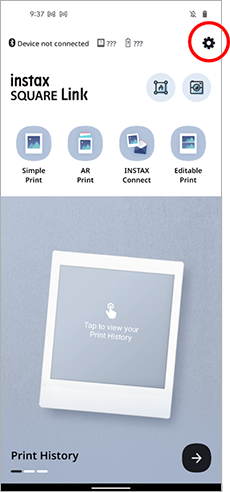
4. Tap "Bluetooth settings".
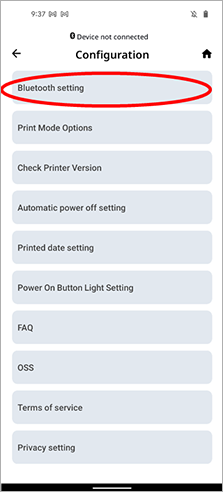
5.Tap "Connect".
If multiple printers are shown, select the ID that matches the ID on the bottom of your printer.
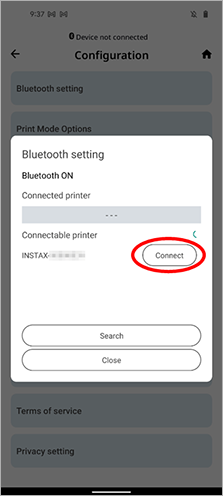
6. Tap the box to add a checkmark next to "Allow access to your contacts and call history", then tap "Pair".
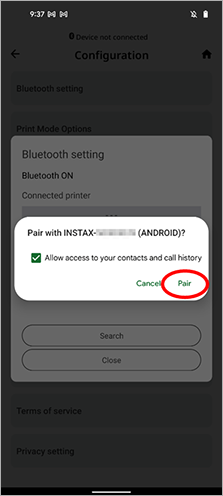
One. To connect another smartphone, you will need to unpair the smartphone that is currently connected.
Location needs to be enabled in order to connect to the printer through Bluetooth.
You can confirm this by checking "Check Version Updates for Printer" in the app settings when the printer is connected.
- Open the SQUARE Link App and tap the “Settings” icon (
) in the upper right.
- When the settings menu screen opens, tap “Check Version Updates for Printer”.(Connect the printer if it is not connected already.)
- If new firmware update information appears, follow the instructions on-screen to update.
【Supported extensions】
Supports video files taken with iOS / Android devices (not compatible with Android HDR video).
【Video length】
Three minutes or less
Refer to the table below.
The LED indicates printer status.
| Display | Status |
|---|---|
| Flashing blue | Updating firmware |
| Flashing purple | Reprinting |
| Lights yellow for 3 seconds, then power turns off | Low battery *If this continues even when charged, there may be a malfunction. Please contact your FUJIFILM dealer or support center. |
| Flashing yellow (continuous) | Printer error *If this occurs frequently, there may be a malfunction. Please contact your FUJIFILM dealer or support center. |
The part that says “instax™” in the middle of the printer is the power button.
Press & hold the power button to switch the printer on and off.
You will need to follow your country's regulations when disposing of the printer.
If you have any questions, see the online manual below, or contact our support center.
Manual
There are no images to reprint. Reprint images are deleted when the power is turned off.
Close the app, then scan the QR code on the AR print again.
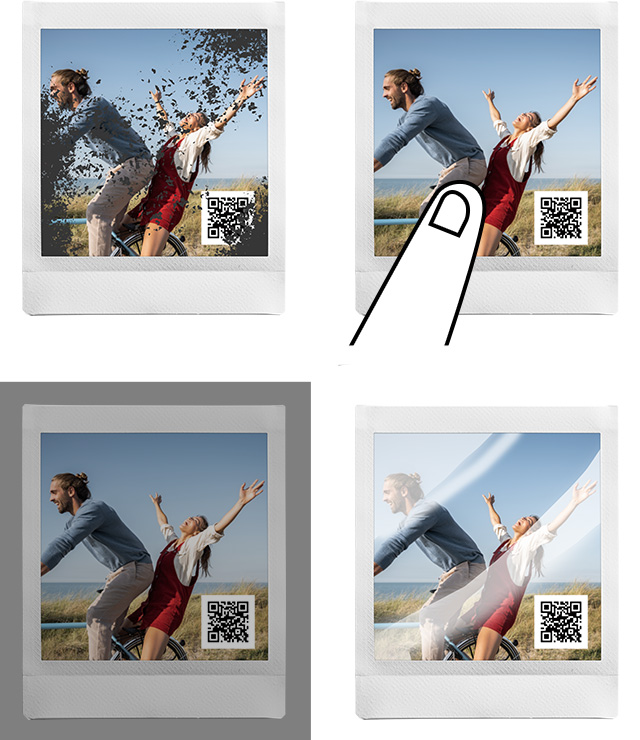
AR is displayed by detecting the print image. If AR is not displayed properly, it may be due to the following.
1. Images with few differentiating features
These features are the contours of people and objects. Images that lack clear outlines or have out-of-focus or blurry images may not be detected.
2. Low-contrast images
Contrast is the difference of brightness or color in an image. Low-contrast images may not be detected.
3. The smartphone camera can’t detect the print image
The smartphone camera must be able to detect all of the the print image. The following issues may make the print image undetectable.
- The image is dirty.
- The image is obscured by the way you are holding the print.
- Poor lighting.
- Natural or artificial lighting is reflected by the image, causing it to shine.
For Android users:
Smartphones other than those listed below may not display AR content properly.
https://developers.google.com/ar/devices
60 characters.
Up to 10 reactions can be exchanged in total. Send a new image to continue using reactions.
Collage photos can be downloaded once the entire frame is filled with photos.
Up to 20 copies.
Up to eight times.
For one month after creation.
Follow the steps below.
- Launch the instax SQUARE Link™ app and tap the settings icon on the upper right.
- Once you are on the settings menu screen, tap “Printer automatic power off settings”.
- Select whether or not to turn off the printer automatically.
The apps are designed for specific products and are not compatible.
AR Prints are not compatible with computers. Please use the smartphone app.
instax Connect™ is not compatible with computers. Please use your smartphone.


