Support
FAQ
You need to charge your printer before using it for the first time. Charge it for about two hours to make sure the battery is full before use.
Follow the process below.
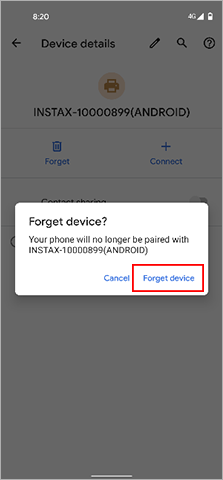
Open the Bluetooth settings screen on the smartphone/tablet that you
don't wish to be connected. Check if any previously-connected Link
printers are displayed.
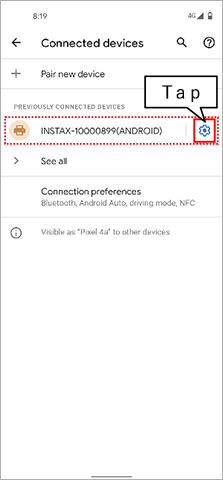
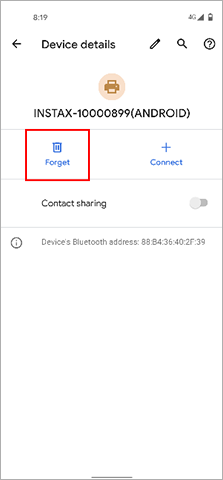
Link printers are displayed as INSTAX-XXXXXXX.
Example) With iOS 14
Example) With Android 11
Your smartphone OS will request the following permissions when the
instax Biz™ app is opened for the first time after installing or updating
the app.
Some or all of the app’s functions may be unavailable
if these permissions are not granted.
Check your current settings
and adjust as required.
* The app supports iOS 16 and Android 10 or later.
For iPhone users:
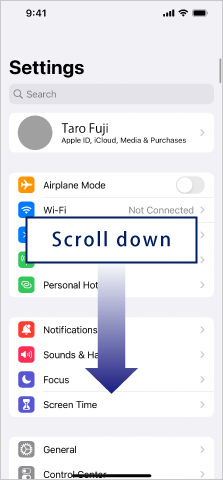
- Tap the “Settings” button on the home screen.
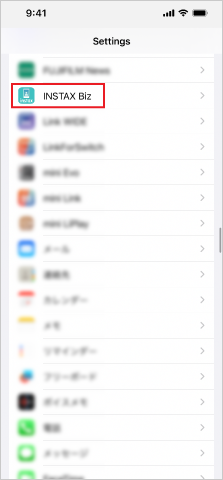
- Scroll down to the instax Biz™ icon and tap on the icon.
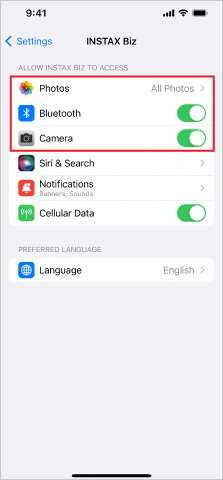
- Check that the “Photos”, “Bluetooth” and “Camera” permissions are set as shown below.
| iOS 14 or later | iOS 13 | iOS 12 or earlier | |
|---|---|---|---|
| “Photos” permissions | Select “All photos” | Select “Read and write” | Select “Read and write” |
| “Bluetooth” permissions | Slide right | Slide right | - |
| “Camera” permissions | Slide right | Slide right | Slide right |
| iOS 14 or later | |
|---|---|
| “Photos” permissions | Select “All photos” |
| “Bluetooth” permissions | Slide right |
| “Camera” permissions | Slide right |
| iOS 13 | |
| “Photos” permissions | Select “Read and write” |
| “Bluetooth” permissions | Slide right |
| “Camera” permissions | Slide right |
| iOS 12 or earlier | |
| “Photos” permissions | Select “Read and write” |
| “Bluetooth” permissions | - |
| “Camera” permissions | Slide right |
For Android users:
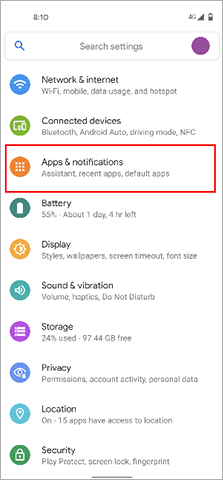
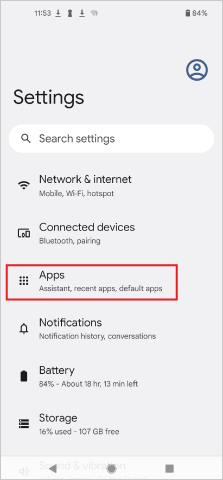
- Tap the “Settings” button on the home screen.
- Android 11 or earlier: Tap “Apps & notifications”.
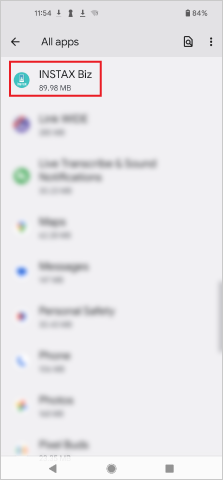
Android 12: Tap “Apps”. - Tap “Display all apps”.
- Scroll down to the instax Biz™ icon and tap on the icon.
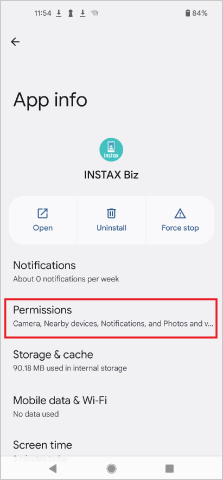
- Tap “Permissions”.
- Check that the “Camera”, “Photos and videos” and “Location” permissions are set as shown below.
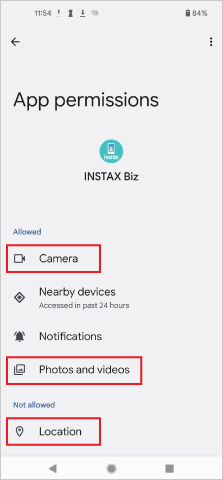
| Android12 | Android11 | Android10 | |
|---|---|---|---|
| “Camera” permissions | Select “Allow only while using the app” | Select “Allow only while using the app” | Select “Allow” |
| “Files and media” permissions | Select “Allow media access only” | Select “Allow media access only” | - |
| “Storage” permissions | - | - | Select “Allow” |
| “Location” permissions | Select "Allow only while using the app" and slide "Use precise location" to the right Select “Allow only | Select “Allow only while using the app” | Select “Allow only while using the app” |
| Android12 | |
|---|---|
| “Camera” permissions | Select “Allow only while using the app” |
| “Files and media” permissions | Select “Allow media access only” |
| “Storage” permissions | - |
| “Location” permissions | Select "Allow only while using the app" and slide "Use precise location" to the right Select “Allow only |
| Android11 | |
| “Camera” permissions | Select “Allow only while using the app” |
| “Files and media” permissions | Select “Allow media access only” |
| “Storage” permissions | - |
| “Location” permissions | Select “Allow only while using the app” |
| Android10 | |
| “Camera” permissions | Select “Allow” |
| “Files and media” permissions | - |
| “Storage” permissions | Select “Allow” |
| “Location” permissions | Select “Allow only while using the app” |
Follow the instructions below
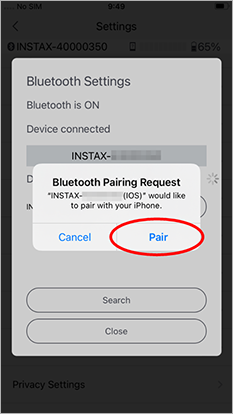
For iPhone users:
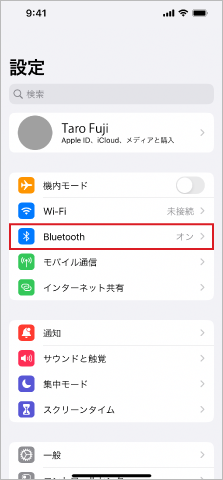
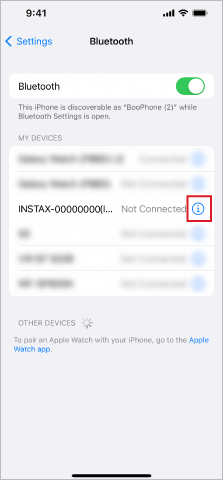
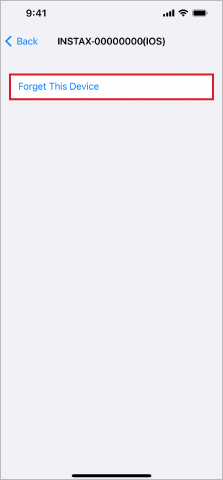
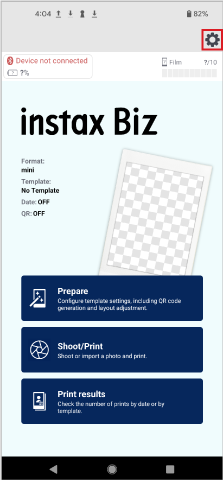
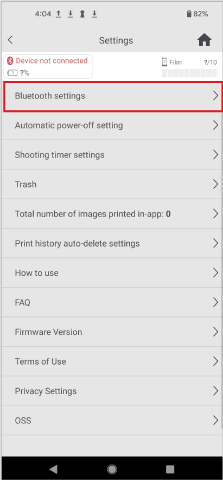
If multiple printers are shown, select the ID that matches the ID on the bottom of your printer.
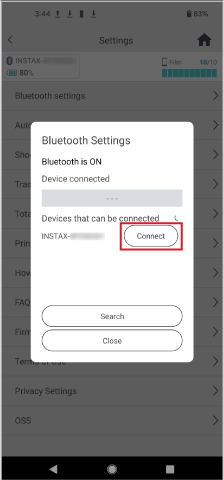
For Android users:
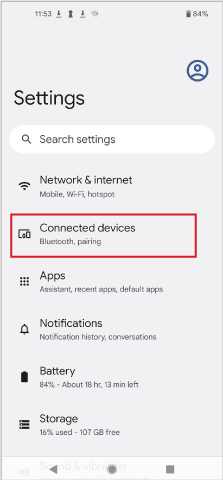
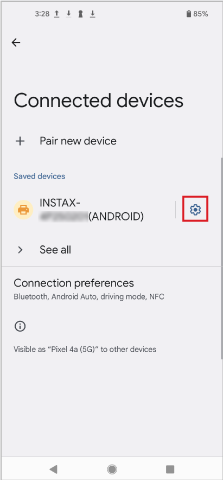
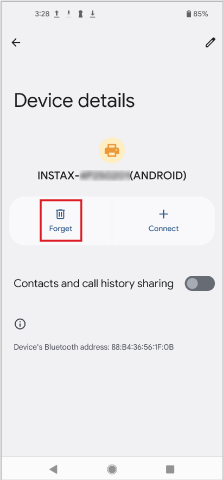
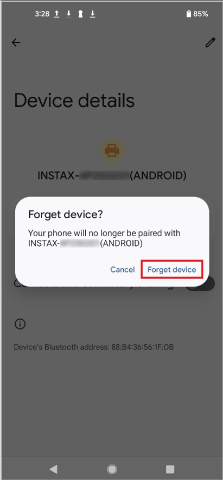
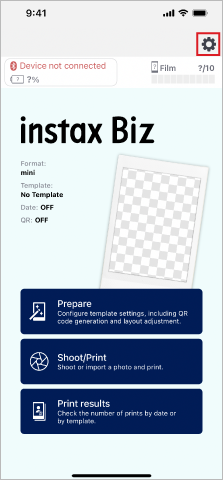
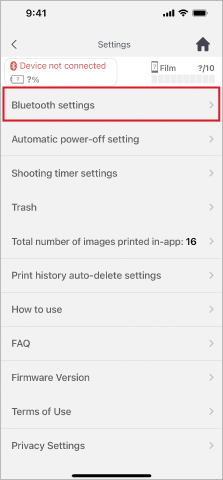
If multiple printers are shown, select the ID that matches the ID on the bottom of your printer.
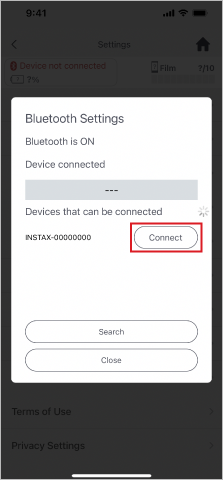
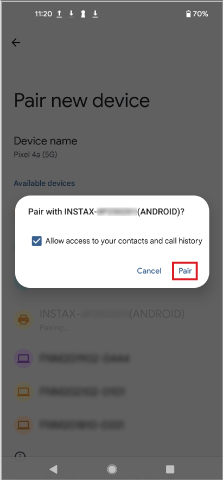
The instax Biz™ app can be paired with one printer at a time.
To use a
different printer, first disconnect the current printer.
Location access is required to connect the printer via Bluetooth.
The LED indicates printer status.
| Printer status | LED display | |||
|---|---|---|---|---|
| instax mini Link3™ | instax mini Link2™ | instax SQUARE Link™ | instax Link WIDE™ | |
| Charging | Blinking light If printer is turned off while charging, the light will blink |
- Blinking | -
Blinking If printer power is off while charging, it will blink |
- Blinking |
| Reprinting * Reprinting via printer operation |
- Blinking light | - Blinking | - Blinking | No function |
| Updating firmware * Firmware cannot be updated via the instax Biz™ app. Download and update via the app for your printer. |
- Blinking | |||
| Low battery * If this continues after charging, there may be a malfunction. Please contact us. |
- Lights for 3 seconds before the power turns off | |||
| Printer error * If this happens frequently, there may be a malfunction. Please contact us. |
- Blinks continuously | |||
| instax mini Link3™ | |
|---|---|
| Charging | Blinking If printer is turned off while charging, the light will blink |
| Reprinting *1 | Blinking light |
| Updating firmware *2 | Blinking light |
| Low battery *3 | - Lights
for 3 seconds before the power turns off |
| Printer error *4 | - Blinks continuously |
| instax mini Link2™ | |
| Charging | - Blinking |
| Reprinting *1 | - Blinking |
| Updating firmware *2 | - Blinking |
| Low battery *3 | - Lights
for 3 seconds before the power turns off |
| Printer error *4 | - Blinks continuously |
| instax SQUARE Link™ | |
| Charging | -
Blinking If printer power is off while charging, it will blink |
| Reprinting *1 | - Blinking |
| Updating firmware *2 | - Blinking |
| Low battery *3 | - Lights
for 3 seconds before the power turns off |
| Printer error *4 | - Blinks continuously |
| instax Link WIDE™ | |
| Charging | - Blinking |
| Reprinting *1 | No function |
| Updating firmware *2 | - Blinking |
| Low battery *3 | - Lights
for 3 seconds before the power turns off |
| Printer error *4 | - Blinks continuously |
*2. Firmware cannot be updated via the instax Biz™ app.
Download and update via the app for your printer.
*3. If this continues after charging, there may be a malfunction. Please contact us.
*4. If this happens frequently, there may be a malfunction. Please contact us.
instax mini Link 2™, instax SQUARE Link™, instax Link WIDE™:
The button is located in the center of the smartphone printer's surface where the word "instax" is written.
instax mini Link 3™:
The button is located on the top where "
Please press and hold the button to turn the power on and off.
You will need to follow your country's regulations when disposing of the
printer.
If you have any questions, see the online manual below, or
contact our support center.
Use the functions below.
- Touch an area within the camera screen to adjust the brightness & focus area before you take a picture.
- Pinch in or out to zoom in or out, respectively.
After pairing your printer, go to “Check for firmware updates” in “Settings” in the app.
The image specifications for creating a template includes the following requirements:
Up to three images
Image file format
PNG, JPG and HEIF filesAnimated PNG (APNG) files are not supported.
Image size (pixels) for instax™ format prints is as follows:
mini: 600 x 800 (width by height)SQUARE: 800 x 800 (width by height)
WIDE: 1,260 x 840 (width by height)
Size can be adjusted in the app, but processes run more smoothly when starting with an initial image of the appropriate size (listed above).
See here.,Up to three images can now be used to make a template.
These images are combined and turned into a single image when you press the "Create" button.
Once combined, they can no longer be edited individually.
The print size you selected for shooting may not be supported by the
smartphone printer currently in use.
Connect to a compatible printer
via the Bluetooth settings, or set a compatible size for the connected
smartphone printer.
Only PNG, JPG and HEIF images are displayed.
Make sure your image is in the correct format.
If it isn't, convert it to PNG, JPG or HEIF then save it again.
From your “History”, you can select the thumbnail of a previously printed
photo and reprint it.
You can print multiple copies using the '+'
symbol.
To protect personal information, photo data taken with the app cannot be downloaded to your smartphone or tablet.
Disconnect the current smartphone printer and pair to another one.
When swapping between printer models: instax mini Link 3™, instax mini Link 2™, instax SQUARE Link™ and instax Link WIDE™, make sure the size of your film matches the “Print Size” settings in “Template”.
Check the ID of the connected smartphone printer (SSID: INSTAX-********) in the app with the ID on the bottom of the printer to see if they match.
Connect your smartphone/tablet via Wi-Fi, Bluetooth or USB to transfer
the image, or access it from your smartphone/tablet via the Cloud.
These steps are not required if you created a Frame Image for a template
with a smartphone/tablet installed with instax Biz™.
* Make sure the image file format has not been changed from PNG.
Link series smartphone printers connect to smartphones and tablets via Bluetooth. When using instax Biz™, make sure Bluetooth is turned on in your smartphone or tablet settings.
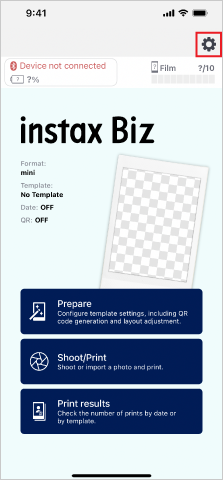
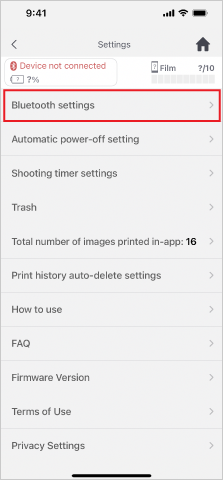
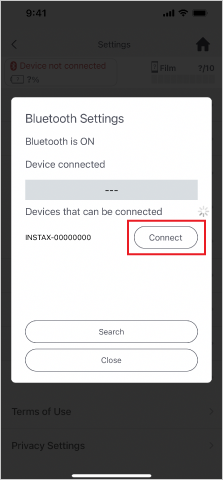
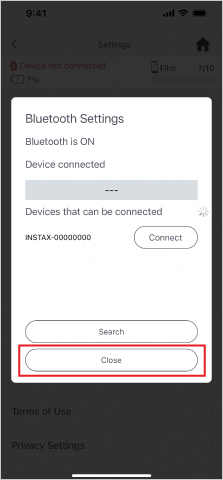
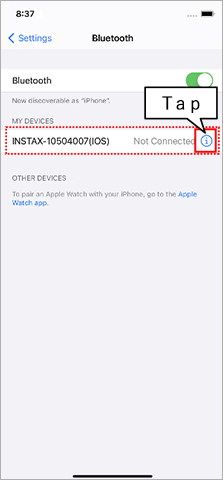
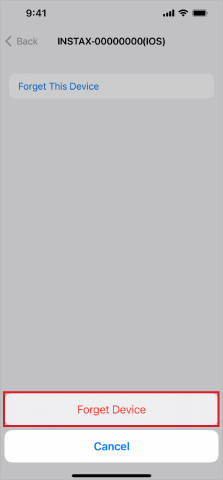
If you are unable to connect your smartphone or tablet to your smartphone printer via Bluetooth, try disconnecting your device from the Bluetooth settings.
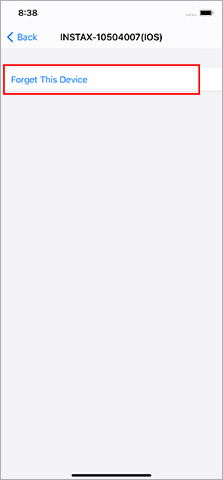
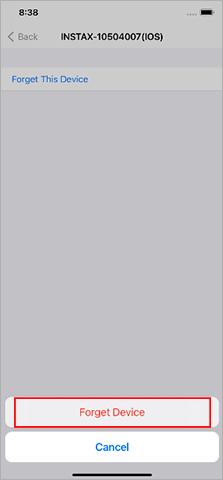
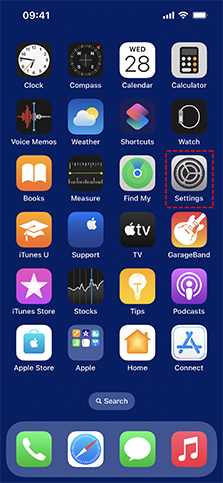
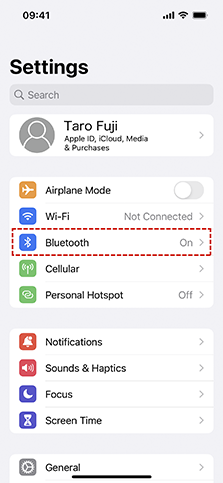
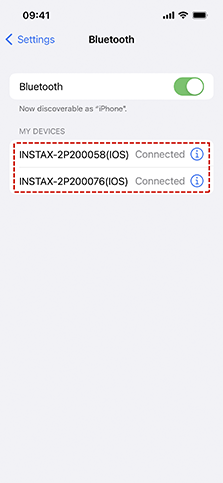
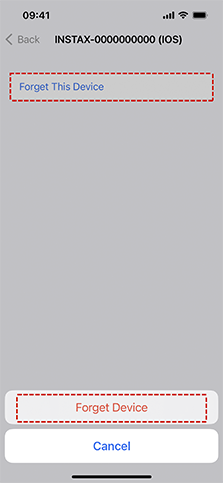
The example below is for iPhone.
- Open your settings
- Select Bluetooth
- Press the ⓘ on connected devices
- Select “Forget This Device” and confirm the selection
An Internet connection is required to use the following functions:
Create template, Edit template, Share template, and Print results*.
* Required for counting the total number of shared template prints. If
printing was done offline, the count is updated the next time you
connect to the Internet.
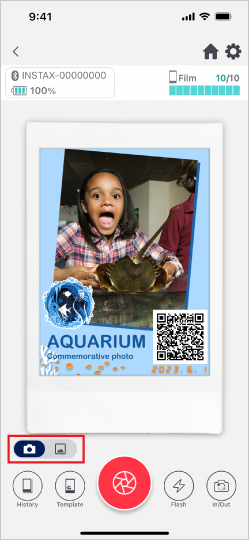
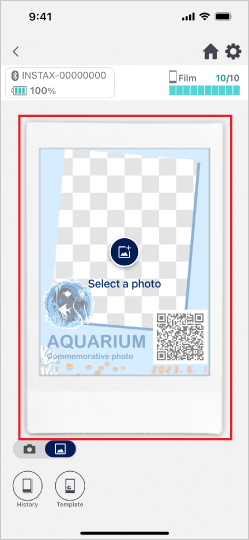
From the homescreen, select “Shoot”, switch the button on the bottom
left of the film frame to “
CAUTION
• Progressive JPEG images are not supported.
• If you cannot find the photo in the photos folder, make sure you have
allowed access to all photos.
Only the URL can be edited after a template has been shared with another
smartphone/tablet.
To make changes, use “Duplicate as new template” to make a new version.
For the current print count, all smartphones/tablets that share the corresponding template must be connected to the Internet. QR code access is only counted for codes generated on the instax Biz™ app.
Only templates created with the instax Biz™ app you're using can be shared. “Share template” cannot be used with templates shared from other smartphones/tablets.
The film cover may not have been ejected, so the printer can't recognize
the new film pack.
If the film cover doesn't come out when putting in a new film pack, open
the film door again, then wait for around 5 seconds before closing it
again. The film cover is ejected when the printer recognizes the new
film pack. After that, the number of remaining photos will reset to 10,
allowing you to resume printing normally.
Use the new "Image correction" function to adjust the brightness, contrast and saturation from the shooting or print preview screens.
See here.,The automatic correction function helps to achieve the best image quality for both your subject and frame.
Your shooting environment may adversely affect the image correction functionality. Avoid backlit environments.
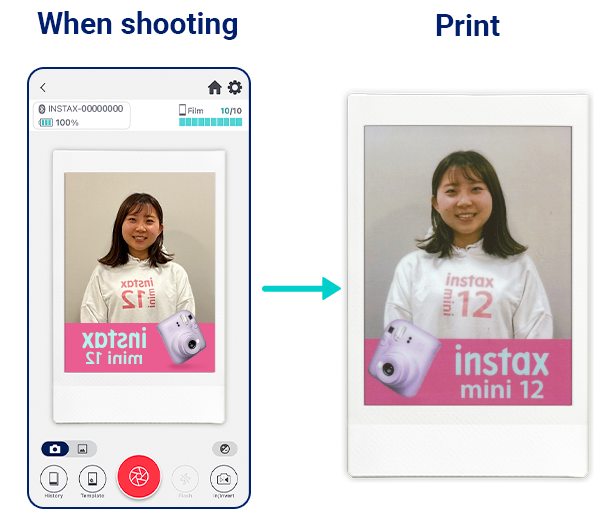
Use the new "front-facing camera flip mode" to display a horizontally flipped template while shooting.
Once shooting is complete, the mode automatically flips the image back to its correct orientation.
This ensures that text appears correctly (not reversed) when using the front-facing camera, making it easier to take pictures
See here.,
Video template display is also horizontally flipped.
Be careful about using countdowns when creating a video template.
・Countdown numbers also need to be horizontally flipped to be put in a video.
・We recommend using audio or the "video recording timer" in the app instead of adding a countdown.
* Change the video recording timer in the "Settings" menu > "Video Recording Timer Settings".
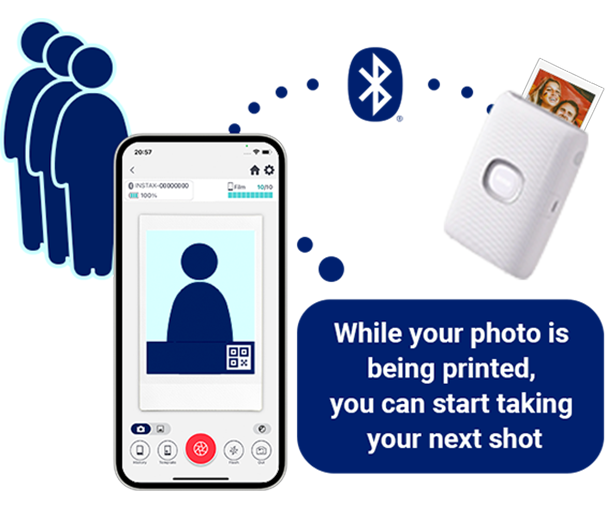
After printing begins, you can start taking your next shot.
However, you cannot print another photo until the current image has finished printing.
The film door may have been opened while film was inside the printer.
As indicated by the replace film notification, insert a new film cartridge. Once the app shows 10 pictures remaining, you will be able to print normally.
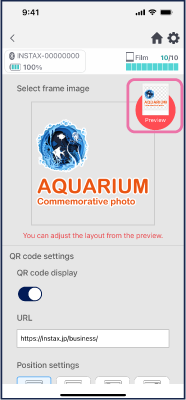
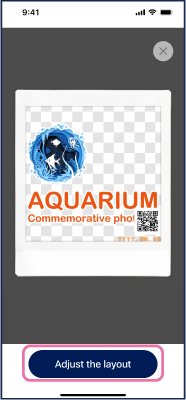
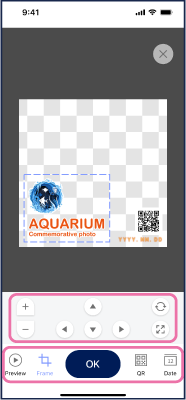
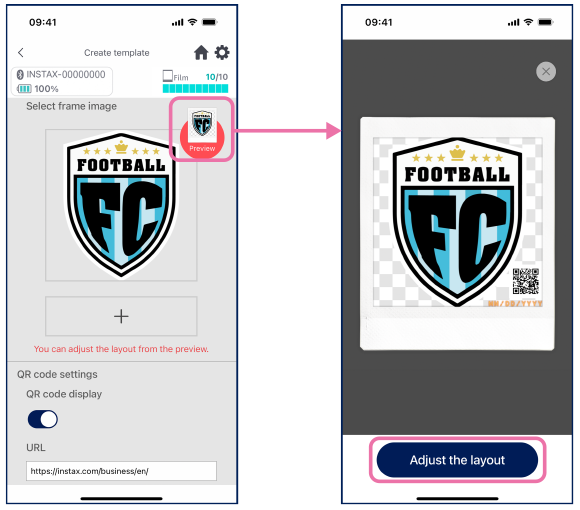
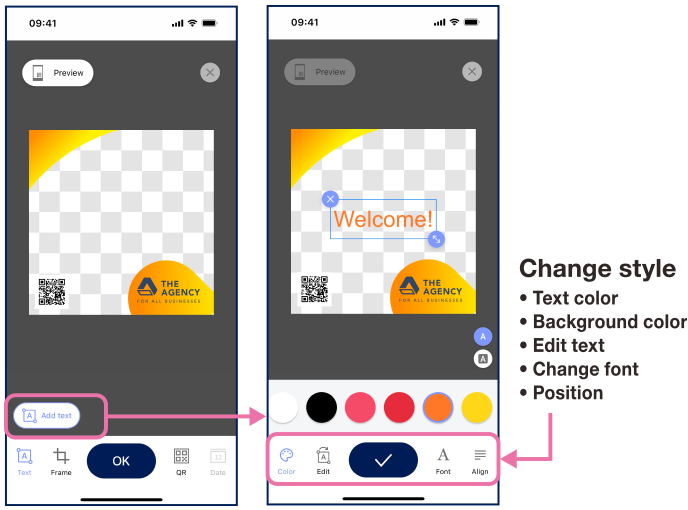
Yes, text can be added to templates. When making your template, press the "Adjust Layout" button, then select the "Text" menu on the bottom of the screen.
You can also change the size, color, and font of the text.
Yes, you can.
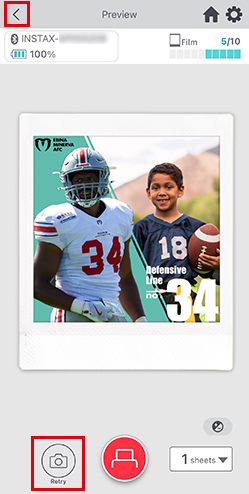
When you use the "<" button to return to the previous screen, template display is randomized again so you can choose a new template.
To start over with random display, press the "<" on the preview screen.
Take the photo again with the same template by pressing the "Redo" button on the bottom of the preview screen.
Compatible specifications are as follows. Make sure to use a video of the following specifications.
Compatible Video Specifications
| Format | iOS: MOV (HEVC), Android: WebM |
| Size | 100 MB or less |
| Dimensions | instax™ mini: 600 x 800 pixel instax™ SQUARE: 800 x 800 pixel instax™ WIDE: 1260 x 840 pixel |
| Length | 3 - 10 sec. |
| Frame rate | 60 fps or lower |
The differences are as follows.
Creating a template
・Still images, QR codes and dates cannot be added when loading a video.
・Video templates can be previewed, but layout changes and other editing is not enabled.
・Video templates can only be shared between devices running on the same OS (not possible to share between iOS and Android devices).
Shooting
・Other operations cannot be performed during video template playback (same as when using the self-timer).
・Random shooting, switching between shooting mode/flash/timer* and color correction (auto/manual) can be set in advance.
* Switch the timer for still image templates from "Shooting Timer Settings", and for video templates from "Video Shooting Timer Settings".
Digital Backdrop Mode extracts the subject from the background, then combining them with a template that has a backdrop to create your finished photograph.
The differences from previous features are as follows:
Creating a template
・Template images can now be set for the foreground and background of the subject. A backdrop must be set.
・Background images, QR codes and dates cannot be added if a video is loaded to the foreground.
Shooting
・The subject (person) is extracted and combined during the shooting process.
・During random shooting, the backdrop is not shown until the shutter button is pressed.
・The subject can also be extracted and displayed from an image selected from your photos folder. However, the subject will not be displayed if a person is not detected.
Manual
Video Template Creation Manual
Download free templates
Simply download these materials, then customize them with your company logo, etc.


