You need to charge your mini Link 2 before using it for the first time. Charge it for about two hours to make sure the battery is full before use.
Follow the procedure below.
- Open the Bluetooth settings screen of a smartphone other than the one you wish to connect. Check if any previously-connected Links are displayed. Links are displayed as INSTAX-XXXXXXX. Delete any Links that are displayed.
- Restart the smartphone that you wish to connect.
- Turn on Bluetooth via the smartphone's settings (if Bluetooth is already turned on, turn it off then on again).
- Turn on the mini Link 2.
- Open the mini Link App on the smartphone, select Bluetooth.
The mini Link 2 can now be paired with the mini Link App.
Your smartphone OS will request the following permissions when the mini Link App is opened for the
first time after installing or updating the app.
Some or all of the app’s functions may be unavailable if these permissions are not granted. Check your
current settings and adjust as required.
For iPhone users:
- Tap the “Settings” button on the home screen.
- Scroll down to the “mini Link” icon and tap on the icon.
- Check that the “Photos”, “Bluetooth” and “Camera” permissions are set as shown below.
iOS 14 or later | iOS 13 | iOS 12 or earlier | |
---|---|---|---|
“Photos” permissions | Select “All photos” | Select “Read and write” | Select “Read and write” |
“Bluetooth” permissions | Slide right | Slide right | - |
“Camera” permissions | Slide right | Slide right | Slide right |
iOS 14 or later | |
---|---|
“Photos” permissions | Select “All photos” |
“Bluetooth” permissions | Slide right |
“Camera” permissions | Slide right |
iOS 13 | |
---|---|
“Photos” permissions | Select “Read and write” |
“Bluetooth” permissions | Slide right |
“Camera” permissions | Slide right |
iOS 12 or earlier | |
---|---|
“Photos” permissions | Select “Read and write” |
“Bluetooth” permissions | - |
“Camera” permissions | Slide right |
For Android users:
- Tap the “Settings” button on the home screen.
- Android 11 or earlier: Tap “Apps & notifications”.
Android 12: Tap “Apps”. - Tap “Display all apps”.
- Scroll down to the “mini Link” icon and tap on the icon.
- Tap “Permissions”.
- Check that the “Camera”, “Files and media/Storage” and “Location” permissions are set as shown below.
Android 12 | Android 11 | Android 10 | Android 9 or earlier | |
---|---|---|---|---|
“Camera” permissions | Select “Allow only while using the app” | Select “Allow only while using the app” | Select “Allow” | Slide right |
“Files and media” permissions | Select “Allow media access only” | Select “Allow media access only” | - | - |
“Storage” permissions | - | - | Select “Allow” | Slide right |
“Location” permissions | Select "Allow only while using the app" and slide "Use precise location" to the right | Select “Allow only while using the app” | Select “Allow only while using the app” | Slide right |
Android 12 | |
---|---|
“Camera” permissions | Select “Allow only while using the app” |
“Files and media” permissions | Select “Allow media access only” |
“Storage” permissions | - |
“Location” permissions | Select "Allow only while using the app" and slide "Use precise location" to the right |
Android 11 | |
---|---|
“Camera” permissions | Select “Allow only while using the app” |
“Files and media” permissions | Select “Allow media access only” |
“Storage” permissions | - |
“Location” permissions | Select “Allow only while using the app” |
Android 10 | |
---|---|
“Camera” permissions | Select “Allow” |
“Files and media” permissions | - |
“Storage” permissions | Select “Allow” |
“Location” permissions | Select “Allow only while using the app” |
Android 9 or earlier | |
---|---|
“Camera” permissions | Slide right |
“Files and media” permissions | - |
“Storage” permissions | Slide right |
“Location” permissions | Slide right |
One. To connect another smartphone, you will need to unpair the smartphone that is currently connected.
Location needs to be enabled in order to connect to the printer through Bluetooth.
You can confirm this by checking "Check Version Updates for Printer" in the app settings when the printer is connected.
- Open the mini Link App and tap the “Settings” icon (
) in the upper right.
- When the settings menu screen opens, tap “Check Version Updates for Printer”.(Connect the printer if it is not connected already.)
- If new firmware update information appears, follow the instructions on-screen to update.
【Supported extensions】
Supports video files taken with iOS / Android devices (not compatible with Android HDR video).
【Video length】
Three minutes or less
Refer to the table below.
Display | Error details |
---|---|
Blinking blue | Updating firmware |
Blinking purple | Reprinting |
Blinking yellow (turns off after 3 seconds) | Cannot charge Almost no remaining battery |
Blinking yellow | Film discharge error |
There are four functions as follows.
- Mode:
Direct the LED light on the side of the printer at your smartphone, then move the printer while holding the upper button to draw pictures. - instax Camera Mode:
Tilt the printer inwards to zoom in.
Tilt the printer outwards to zoom out.
Push the power button to take a photo.
- Reprint:
Press the power button with the print exit slot facing down. - Switch between Print Mode and Fun Mode:
Stand the printer up for Print Mode.
Move the printer so the power button is facing up for Fun Mode.
The part that says “instax” in the middle of the printer is the power button.
Press & hold the power button to switch the printer on and off.
You will need to follow your country's regulations when disposing of the printer.
If you have any questions, see the online manual below, or contact our support center.
Manual
There are no images to reprint. Reprint images are deleted when the power is turned off.
After connecting the printer, make sure the toggle on the bottom right of the screen is to the left.

Direct the LED light on the side of the printer at your smartphone while pressing & holding the feature button.

Tap the "Mirror" button on the lower right corner of the instax AiR screen during or after drawing the text and before taking a picture. This will invert the drawn text and make it readable.
Things you have drawn can only be erased in full. Press the reset button on the lower left of the screen.

The LED light may not be detected outdoors or in other brightly lit environments. In such cases, use Draw with Smartphone Mode instead.

Turn the flash off (located on the lower left of the screen).
Set the “Print with video download setting” in app settings to “Allow”.
Data from a QR code made with can be accessed for two years. During those two years, you can also save the data to your smartphone.
It can be downloaded two times.
Set as follows when Switch Direct Print is not working on a connected Switch.
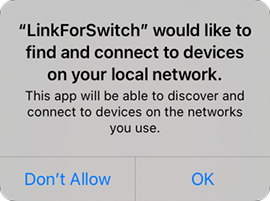
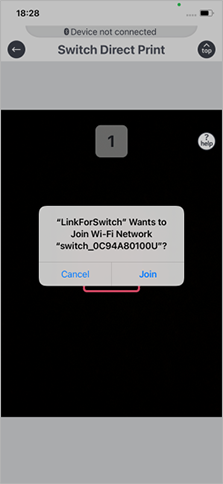
The “Local network” permissions screen is shown when selecting Switch Direct Print for the first time
on an iOS 14/15 iPhone/iPad.
If “Do not allow” was selected, the captured screenshot is not displayed after reading the QR code.
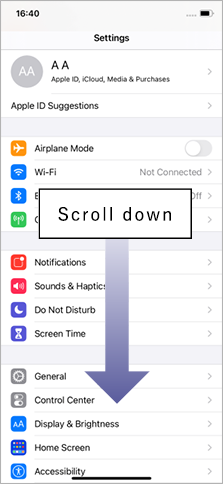
Enable "Local Network" permissions in your smartphone settings.
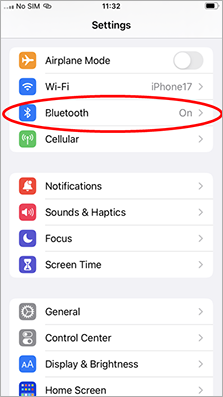
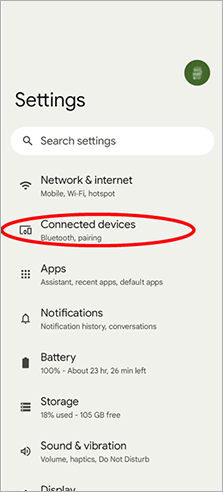
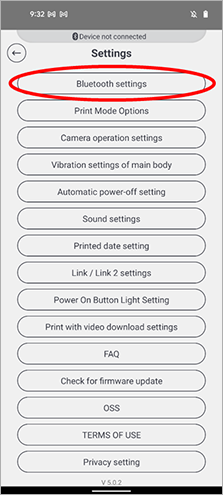
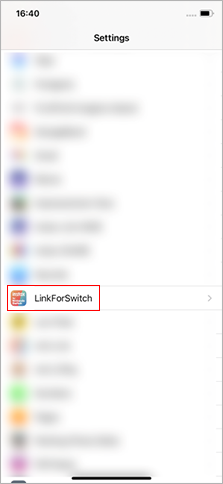
Tap the "Settings" button on your home screen.
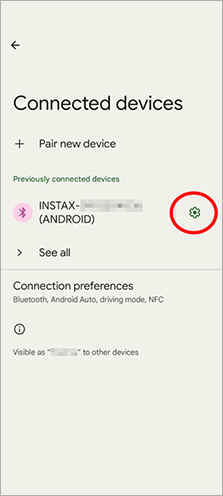
Scroll down and tap the "Link for Switch" icon.
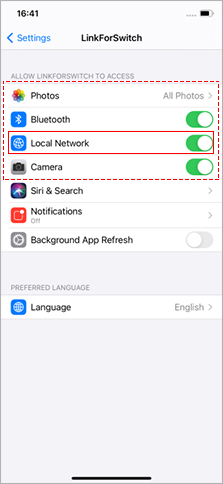
Enable "Local Network" permissions (slider to the right).
Also make sure that permissions for "Location", "Photos" and "Camera" are set as follows.
Permission | Setting |
---|---|
"Photos" permissions | Select "All photos" |
"Bluetooth" permissions | Allow (slider to the right) |
"Local Network" permissions | Allow (slider to the right) |
"Camera" permissions | Allow (slider to the right) |
First, confirm the correct procedure.
How to Use Switch Direct Print
If you are still unable to connect after following this procedure, try updating your smartphone
software (both the OS and the app) to the latest versions.
Only Splatoon characters are available on .
The sticker character(s) available depends on the game that the chosen character appears in.
*New Pokémon Snap stickers are not available.