

Support
FAQ
-
A.
You need to charge your instax mini Link+™ before using it for the first time. Charge it for about two hours to make sure the battery is full before use.
-
A.
The power button is on the side, indicated with a power symbol.
Press and hold the power button to switch on and off.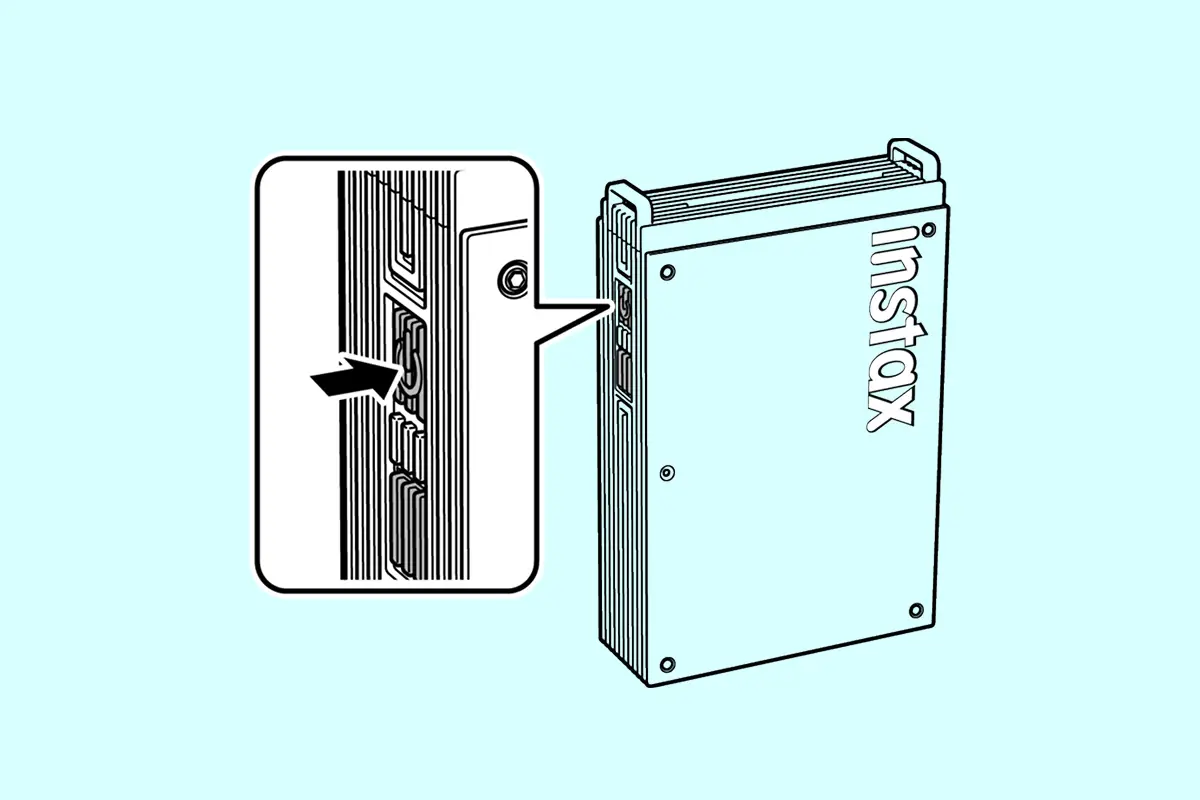
-
A.
Follow the procedure below.
- 1)Launch the instax mini Link™ app and tap the settings icon on the upper right.
- 2)Once you are on the settings menu, access the “Printer settings” tab and tap “Automatic power-off settings.”
- 3)Select whether or not to turn off the printer automatically.
-
A.
Your smartphone OS will request the following permissions when the「instax mini Link™」App is opened for the first time after installing or updating the app.
Some or all of the app’s functions may be unavailable if these permissions are not granted. Check your current settings and adjust as required.For iPhone users:
- 1)Tap the “Settings” button on the home screen.
- 2)Scroll down to the “mini Link” icon and tap on the icon.
- 3)Check that the “Photos”, “Bluetooth” and “Camera” permissions are set as shown below.
iOS 17 iOS 16 “Photos” permissions Select "Full Access" Select "All photos" “Bluetooth” permissions Slide right Slide right “Camera” permissions Slide right Slide right 
For Android users:
- 1)Tap the “Settings” button on the home screen.
- 2)Android 11 or earlier: Tap “Apps & notifications”.
Android 12 or higher: Tap “Apps”. - 3)Tap “Display all apps”.
- 4)Scroll down to the “mini Link” icon and tap on the icon.
- 5)Tap “Permissions”.
- 6)Check that the “Camera”, “Photos and videos” ,“Files and media”,“Storage” and “Location” permissions are set as shown below.
Android 14 Android 13 Android 12 Android 11 Android 10 “Camera” permissions Select “Allow only while using the app” Select “Allow only while using the app” Select “Allow only while using the app” Select “Allow only while using the app” Select “Allow” “Photos and videos”permissions Select “Allow” Select “Allow” - - - “Files and media” permissions - - Select “Allow media access only” Select “Allow media access only” - “Storage” permissions - - - - Select “Allow” “Location” permissions Select "Allow only while using the app" and slide "Use precise location" to the right Select "Allow only while using the app" and slide "Use precise location" to the right Select "Allow only while using the app" and slide "Use precise location" to the right Select “Allow only while using the app” Select “Allow only while using the app” Android 14 “Camera” permissions Select “Allow only while using the app” “Photos and videos”permissions Select “Allow” “Files and media” permissions - “Storage” permissions - “Location” permissions Select "Allow only while using the app" and slide "Use precise location" to the right Android 13 “Camera” permissions Select “Allow only while using the app” “Photos and videos”permissions Select “Allow” “Files and media” permissions - “Storage” permissions - “Location” permissions Select "Allow only while using the app" and slide "Use precise location" to the right Android 12 “Camera” permissions Select “Allow only while using the app” “Photos and videos”permissions - “Files and media” permissions Select “Allow media access only” “Storage” permissions - “Location” permissions Select "Allow only while using the app" and slide "Use precise location" to the right Android 11 “Camera” permissions Select “Allow only while using the app” “Photos and videos”permissions - “Files and media” permissions Select “Allow media access only” “Storage” permissions - “Location” permissions Select “Allow only while using the app” Android 10 “Camera” permissions Select “Allow” “Photos and videos”permissions - “Files and media” permissions - “Storage” permissions Select “Allow” “Location” permissions Select “Allow only while using the app” 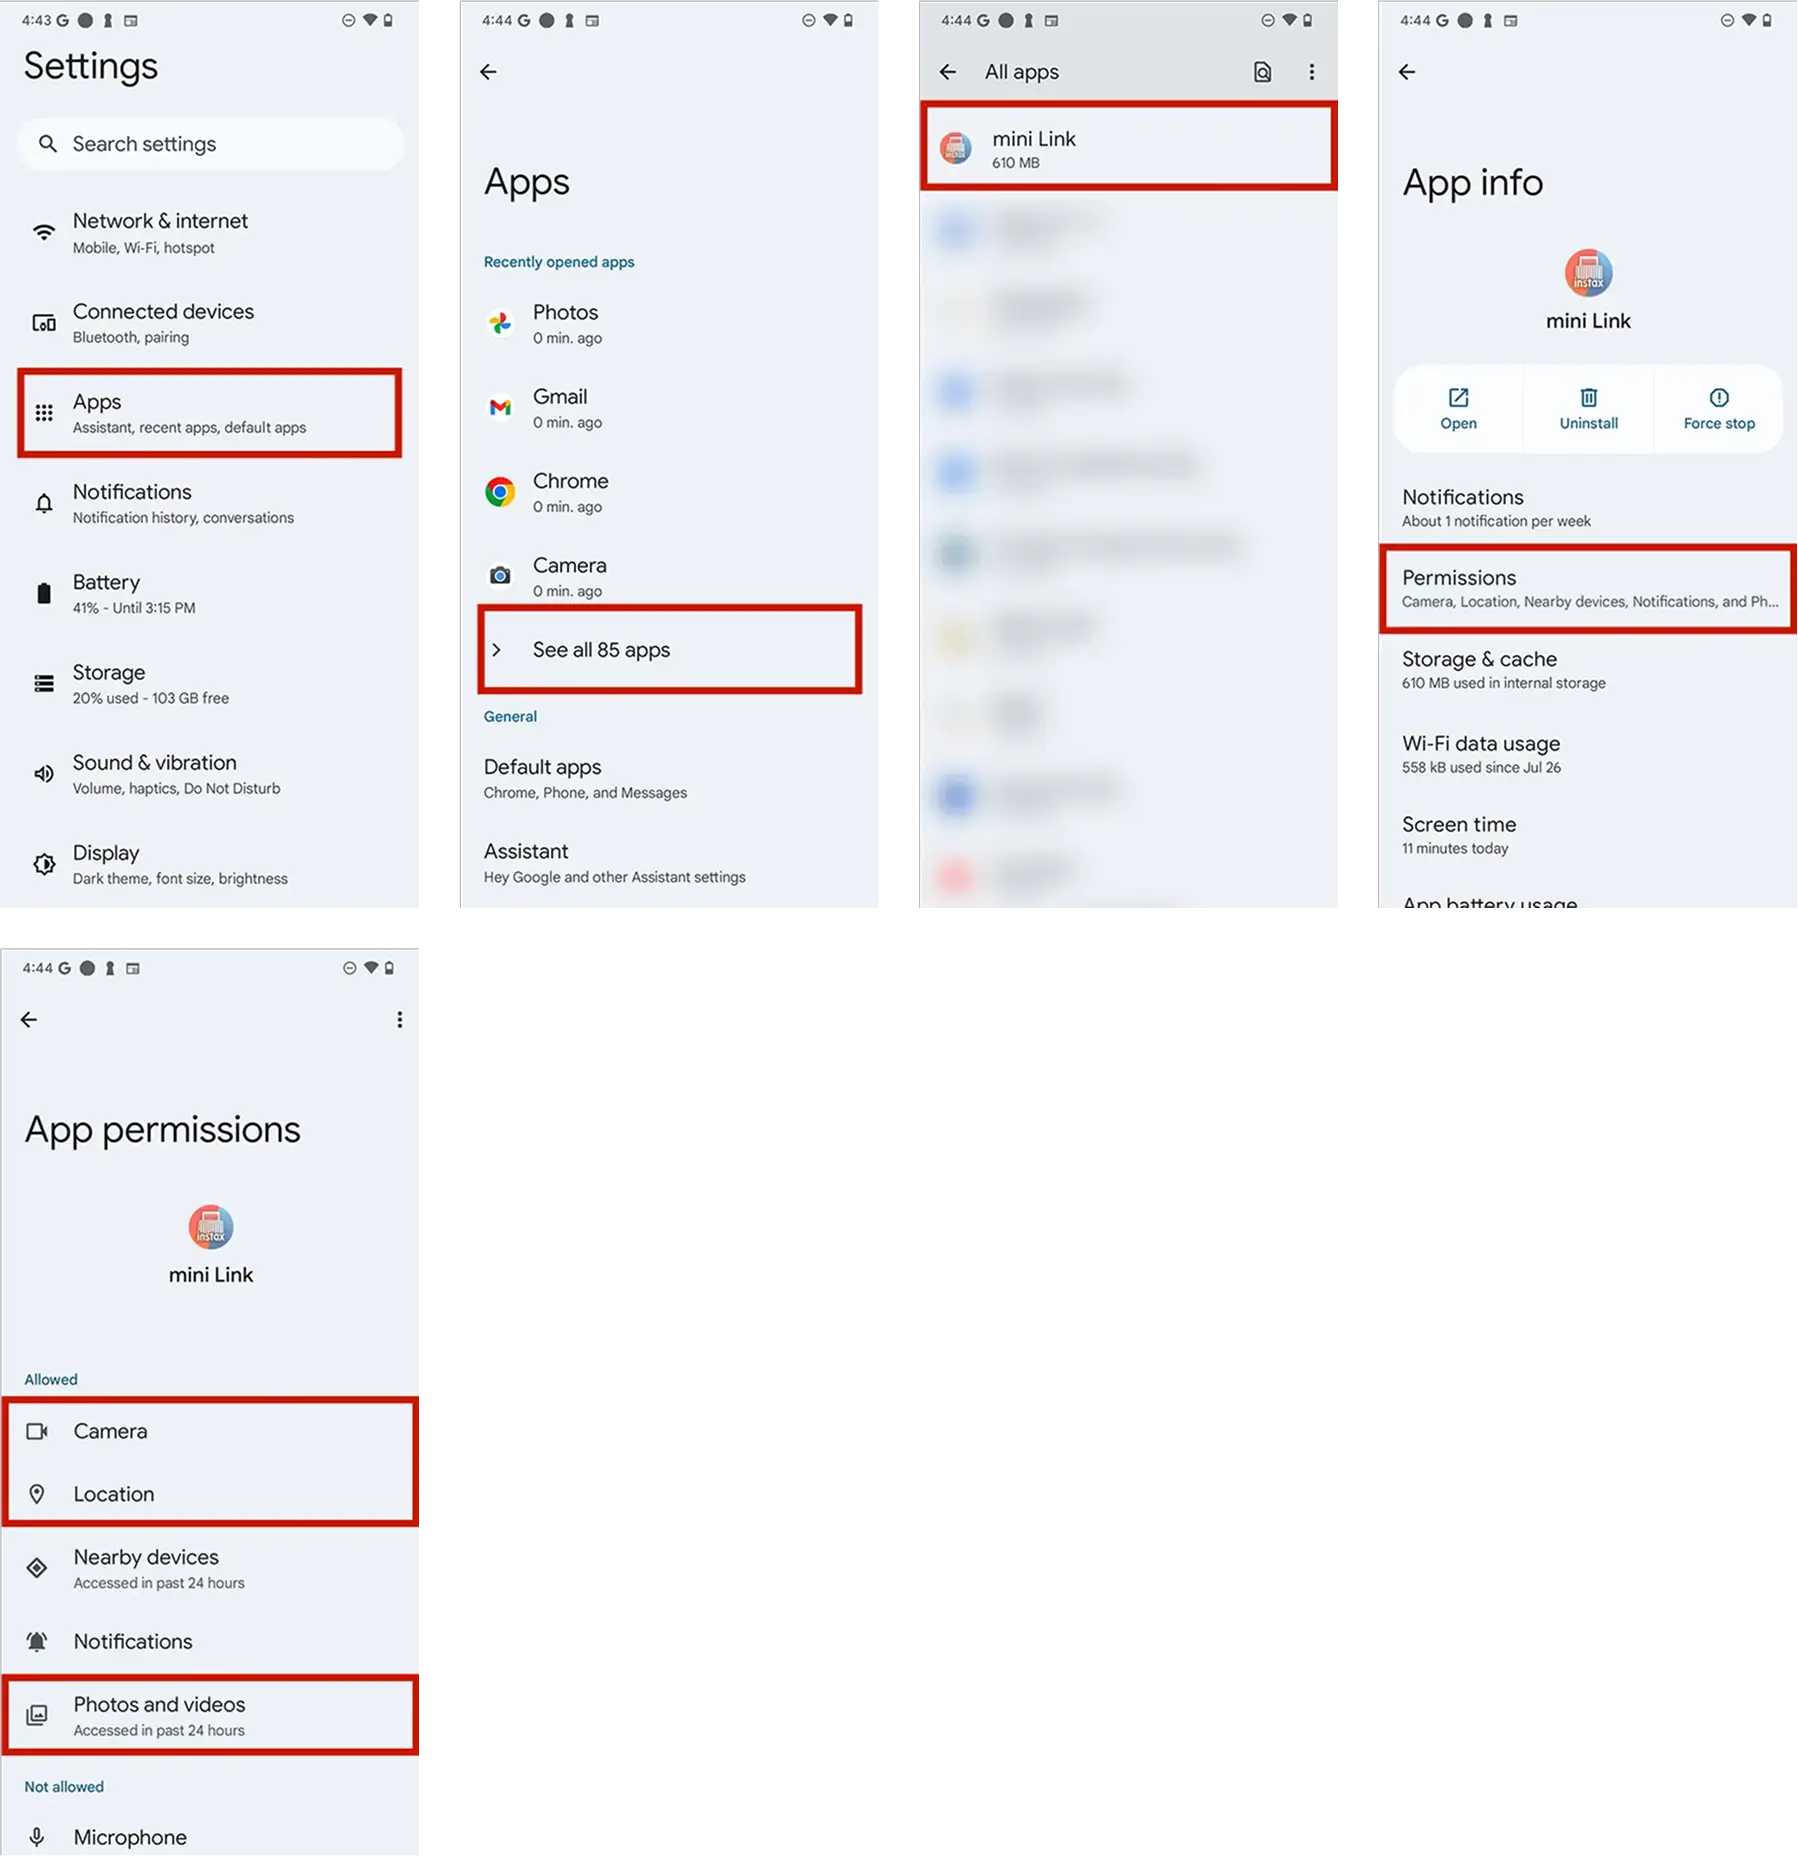
-
A.
Follow the procedure below.
- 1)Open the Bluetooth settings screen of a smartphone you wish to connect. Check if any previously connected instax mini Link+™ are displayed. instax mini Link+™ are displayed as INSTAX-XXXXXXX. Delete any Links that are displayed.
- 2)Restart the smartphone that you wish to connect.
- 3)Turn on Bluetooth through the smartphone’s settings (if Bluetooth is already turned on, turn it off, then on again).
- 4)Turn on the printer's power while holding down the button.
- 5)Open the Link app on the smartphone, select Bluetooth settings from the app’s settings screen then press the search button.
The printer can now be paired with the instax mini Link™ app.
Example) With iOS 17 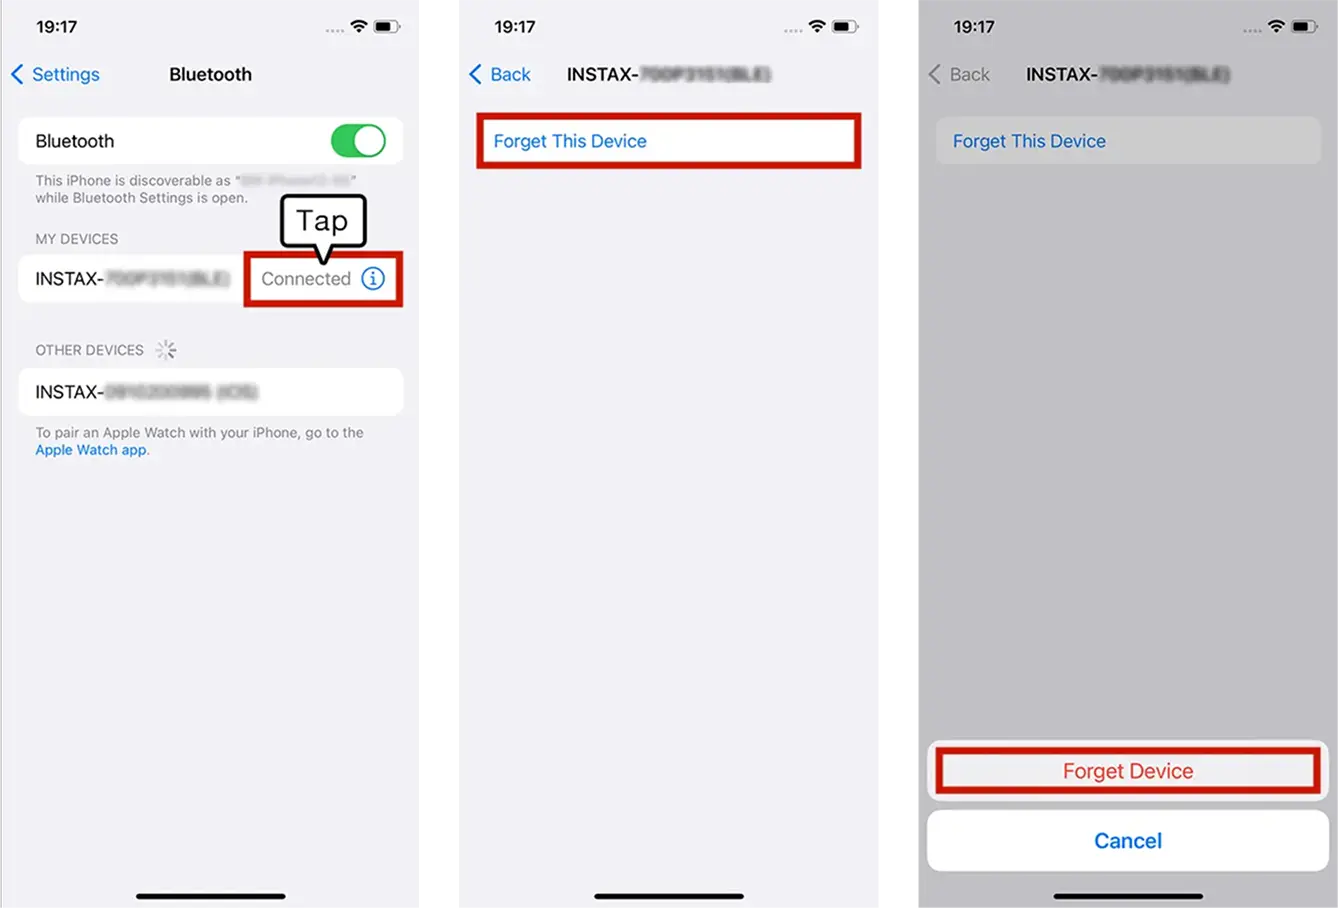
Example) With Android 14 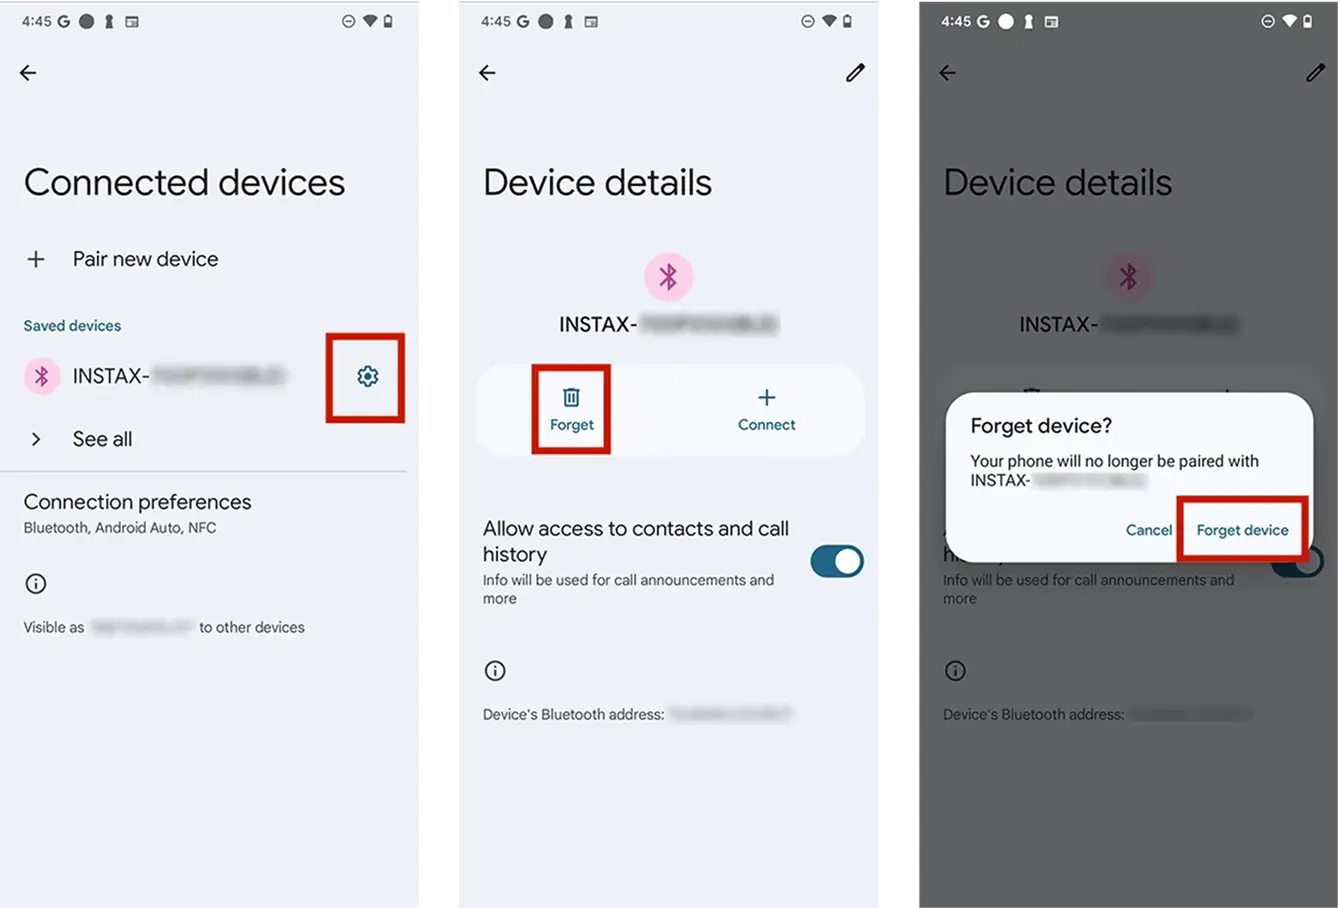
-
A.
One. To connect another smartphone, you will need to unpair the smartphone that is currently connected.
-
A.
Location needs to be enabled in order to connect to the printer through Bluetooth.
-
A.
If pop-up windows appear twice, select “pair” on both windows.
-
A.
After connecting the printer, check the version update status via the “Check Printer Version Update” option in the app settings.
- 1)Launch the “instax mini Link™” app and tap the ‘Settings’ icon in the upper right corner.
- 2)The settings menu screen will appear. Tap “Check Printer Version Update” within the “Printer Settings” tab to check.
-
A.
- 1)Launch the instax mini Link™ app and tap the settings icon on the upper right.
- 2)Once you are on the settings menu screen, access the “Printer settings” tab, then tap “Check for firmware updates”.
(Make sure your printer is connected when you perform this step) - 3)If a new firmware update is available, follow the instructions on your screen to update.
-
A.
【Supported extensions】
Supports video files taken with iOS / Android devices (not compatible with Android HDR video).【Video length】
Three minutes or less -
A.
Refer to the table below.
Display Status Blinking blue Updating firmware White LED (pulsing) Reprinting Blinking yellow (turns off after 3 seconds) • Cannot be charged
• Low batteryBlinking yellow Film discharge error -
A.
・Check battery level by pressing the function button on the side while the power is on.
*Please check the next sheet for the figures.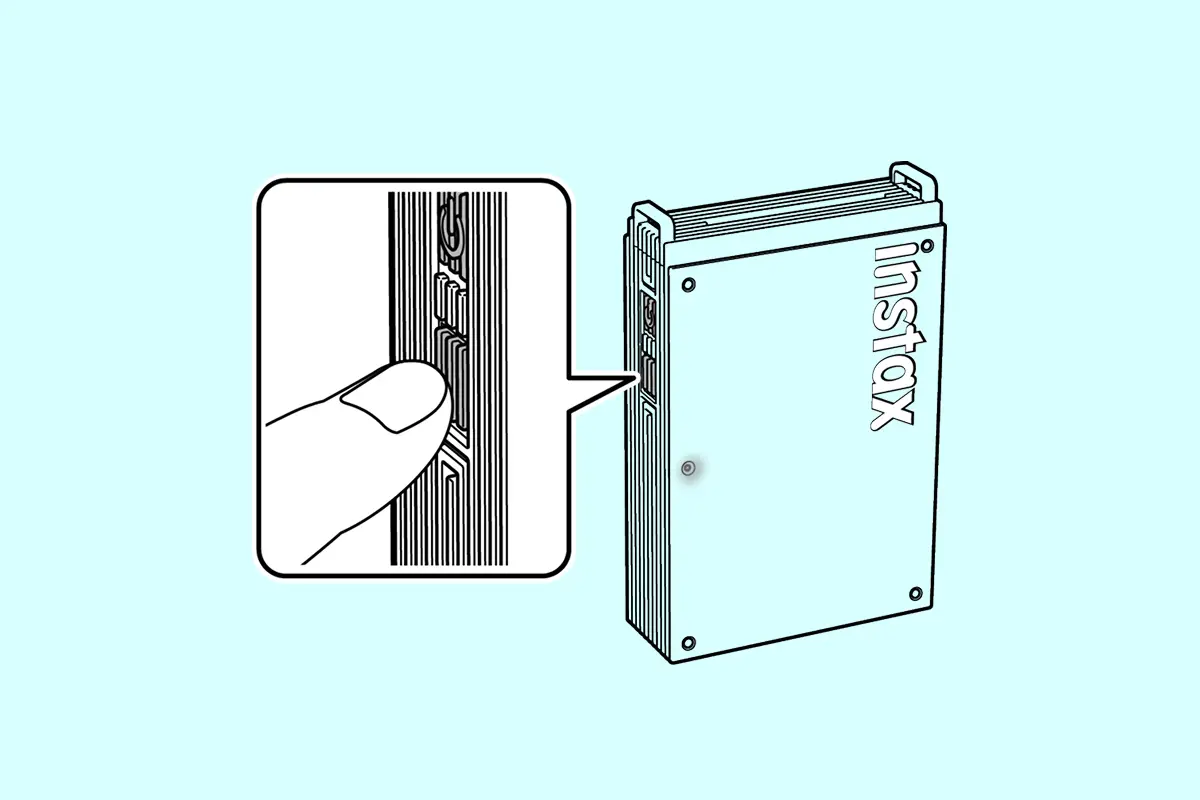
LED Battery Level Flashes green once Low Flashes green twice Medium Flashing green three High If your printer is connected to the instax mini Link™ app, you can also check the battery level from the app.
-
A.
There are three functions as follows.
・instax AiR Studio™ mode:
Press the power button to shoot.
Press the function button while an effect is selected to play an effect.・instax™ Camera mode:
Tilt the printer toward you to zoom in.
Tilt the printer away from you to zoom out.
Push the power button to shoot.・Reprint:
Press the power button with the print exit slot facing down.
-
A.
There are no images to reprint. Reprint images are deleted when the power is turned off.
-
A.
To add images from Pinterest®, firstly, log into the Pinterest® app save the images you would like to print. Please refer to the detailed steps below.
https://instax.com/mini_link_plus/en/#features_step01 -
A.
Based on Pinterest® Developer Guidelines, images added from the Pinterest® app are not saved in “Print History”.
If you wish to re-print the image, please import the image again from the Pinterest® app. -
A.
The maximum number of selectable images in-app when using Simulation or Mulitple Print mode is 10.
-
A.
Design Print mode allows for sharper reproduction of details such as text and intricate illustrative patterns.
For more details, please visit:
https://instax.com/mini_link_plus/en/#design_print -
A.
To print using Design Print mode, the image resolution must be at least 1200×1800 pixels.
Please check the resolution of the image you wish to print using the following steps:<For iPhone users>
- 1)Select the image you want to print in the Photos app.
- 2)Tap the "ⓘ" button.
- 3)Verify that the displayed image size is 1200×1800 pixels or larger.
<Android Users>
- 1)Select the image you want to print in the "Photos" app.
- 2)Tap the menu button "︙" in the upper right corner.
- 3)Please confirm that the specified image size is 1200×1800 or larger.
-
A.
Fit Mode is a feature that neatly fits the image without creating margins, even if the image's aspect ratio doesn't match the instax™ mini format print size's aspect ratio. It fills the missing area with colors from the original image to match the print size's aspect ratio.
-
A.
If you run out of film while printing multiple images, the screen will return to the pre-printing state. To print the remaining images, first remove the already printed images from the print selection by pressing the "Trash" button in the upper right corner. Then, replace the film and print the remaining images.
-
A.
- ・instax AiR Studio™ does not work on Android smartphones that don’t support ARCore.
ARCore supported devices are as shown below.
https://developers.google.com/ar/devices
- ・The "instax mini Link™" app can be installed from the link below, so you can check whether "instax AiR Studio™" is compatible with your device before purchasing.
- ・instax AiR Studio™ does not work on Android smartphones that don’t support ARCore.
-
A.
Check below for optimal operation.
- ・Is the camera tilted diagonally toward the floor?
- ・Is the floor distinguishable?
- ・Did you tap the instax™ logo after it appears (when the floor is detected)?
See the following page for more information on how to detect the floor.
https://instax.com/mini_link_3/en/airstudio/ -
A.
- ・See below for more information on instax AiR Studio™ compatible smartphones.
https://instax.com/mini_link_3/en/airstudio/ - ・instax AiR Studio™ generally only cuts out people.*
*You may be able to remove subjects other than people on some devices, but the function may not be precise.
- ・See below for more information on instax AiR Studio™ compatible smartphones.
-
A.
AR effects cannot be moved once placed. Use the “undo” button to remove the AR effects then place them again in the desired position.
-
A.
- ・Images are temporarily saved in the instax AiR Studio™ gallery. Up to 20 images can be displayed here. When you exceed 20 images, the oldest image is deleted.
- ・Images are saved in your print history when printed from the gallery.
Follow the procedure below to lock an image and prevent it from being deleted.
- 1)Tap the “lock” button in the gallery.
- 2)Select the image to lock.
- 3)Tap the “lock” button again to unlock an image.
-
A.
Follow the procedure below to use Remote Live View
- 1)you wish to use Remote Live View on.
- 2)On phone A, with instax AiR Studio™ open, tap the “Remote Live View” button to display the QR code.
- 3)Use phone B to scan the QR code displayed on phone A.
- 4)This launches the instax mini Link™ app on phone B and starts Remote Live View.
Remote Live View Features
- ・Check the live view of what is being shot on phone A from phone B.
- ・Tap the release button on phone B to take a picture from phone A.
-
A.
Access the “Print settings” tab, then tap “Print with video download settings” and select “Allow”.
-
A.
Data from a QR code made with instax AiR Studio™ can be accessed for two years. During those two years, you can also save the data to your smartphone.
-
A.
It can be downloaded two times.
-
A.
- ・Using instax AiR Studio™ to place a large amount of AR effects. or using it for long periods at a time may increase memory usage on your smartphone, causing it to heat up, or making the app run very slow. If any of this happens, close the instax mini Link™ app briefly, then relaunch it.
- ・Make sure to save AR effects.before you close the app so you can resume with them in the same placement when you relaunch the app.
-
A.
Follow the procedure below.
- 1)From the “Print History” screen, tap the photo you took with "Click to Collage"
- 2)Tap the “Play” button in the frame.
- 3)Edit the background, then save the instax Animation™.
-
A.
There’s no limit as long as the image remains in your “Print History”.
-
A.
・Follow the procedure below when using Xapp.
- 1)Transfer the images you want to print from your digital camera, then save them on your smartphone.
- 2)Launch the instax mini Link™ app to import the saved images and print.
-
A.
You will need to follow your country's regulations when disposing of the printer.
If you have any questions, see the online manual below, or contact our support center. -
A.
Apps are only compatible with their specific device.


